The last piece of the cap rail to be re-finished was the short strip on top of the fold-down transom swim step. We had left it until last as we knew we would also need to re-finish the teak swim steps themselves and the transom side trim at the same time so, as soon as the new lifelines were installed, we started in on it.
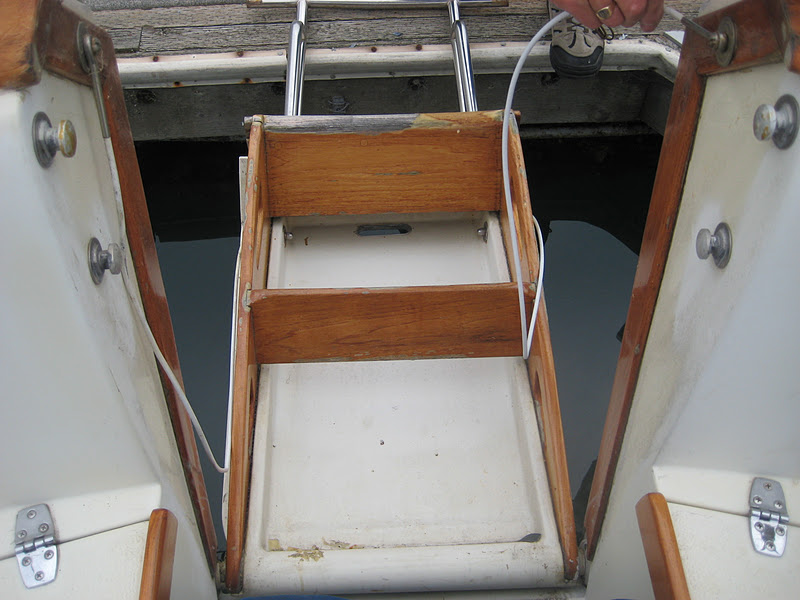
We had always known that the swim step wasn't perfectly aligned with the transom and tended to hang up, but we hadn't looked at it closely and thought it was the woodwork binding. We planned to fix it while we were sanding the central piece of cap rail. However, when we carefully examined the step, we saw some things that sent us off in a couple of new directions........maybe this post should have been titled 'Transom rehab'!

This shot shows the misaligned swim step, almost 1/4", but a close look shows the 'gotcha'....the barrel bolt is perfectly aligned! After a lot of pulling and pushing we forced the step into correct alignment, but only by literally jamming it in place. More disturbing was the fact that we found the cap rail wood had plenty of clearance.

This shot shows the step correctly aligned, but only after forcing it into place. Now look at the barrel bolt!

This close-up shows the position of the barrel bolt with the step correctly aligned. Both bolts had the same problem, showing they were obviously assembled with the step out of alignment at the factory. After finding the swim step wouldn't line up properly with the transom the barrel bolts were just installed to suit ....cute huh!

So, if the cap rail wood wasn't causing the problem what was? We used a piece of paper as a feeler gauge and soon discovered that the actual swim step molding was too wide and was jamming against the transom on both sides.

The edges of the step needed to be eased off by around 1/32" on each side. Obviously, removing that much material would destroy the gel coat on the edges of the step.....maybe that's the reason why nothing was ever done to fix the problem?

Repairing the gelcoat along a narrow strip like the edges of the step molding is probably the easiest gelcoat repair to make, because it is completely hidden most of the time, so it shouldn't have been a big deal to fix it at the factory.......but what do we know! Anyway, it had to be fixed so out came the 'mouse' sander and we tore right in.

Not surprisingly the factory gelcoat was quickly stripped off by the sanding but after a few minutes work the step now closed smoothly into perfect alignment with the transom.


Here we are trying to get the shim off the starboard side of the transom without damaging the gelcoat. For some reason there was no shim under the port side barrel bolt?


While we were waiting for the anti-rattle blocks we stripped and oiled the teak trim on the inside faces of the transom.

In a very unusual development Perko Marine shipped the replacement anti-rattle blocks free, gratis and for nothing.......excellent customer service. New block shown at top and old broken one at the bottom.

Here is one of the new anti-rattle blocks in place under a barrel bolt.

Because the base of the barrel bolts aren't wide enough to completely cover the old mounting holes we will fill them and maybe use a thin cosmetic stainless shim to make things look presentable.

Here is the repaired and repositioned swim step and barrel bolt on the starboard side........

......and the port side. Everything nicely aligned and looking good. And now for the the next piece of bad news, because we had re-aligned the swim step to the transom .....


We were too embarrassed to post a pic showing how we used a come-along and a webbing strap to 'encourage' the stern rail halves back into alignment with the swim step, but that's what we did..... and here is everything back together.


She's starting to look a bit like a boat again!
Now....finally...... we were ready to start refinishing the last piece of teak cap rail and swim steps! While we were at it we also replaced the two swim step tether cables.

We used 1000 grit paper and wet sanded the inside gelcoat on the swim-step molding then finished up with polishing compound and wax. There were a couple of small 'divots' in the gelcoat but nothing too terrible......it's an old boat!


It was a real pain stripping the old varnish and sanding, because of all the weird corners, angles and cut-outs on the steps, but we persevered and it turned out looking pretty good, everything considered.

What is really nice is that deploying the swim step is now a one person, one hand job rather than two people, four hands and lots of cussing! On to the next project.
No comments:
Post a Comment