The Old Matelot


matelot;
noun,
sailor; from the French mat-el-oh (plural matelots)
A slang expression, chiefly in Britain, may also mean mate or companion.

Welcome to the Old Matelots' blog, my first (and probably last!) journalistic endeavour. Watch its development and evolution as I make the transition into retirement and the live-aboard, off the grid lifestyle on the sailing yacht, Circe. Follow my fortunes (and misfortunes) in the posts as I work to rehabilitate my home on the water.

UPDATE - Due major back-to-back relationship and health issues during 2017 & 2018 I was involuntarily beached and forced to let Circe go. The blog will remain up for the foreseeable future for informational benefit to other owners of these magnificent boats.


*******************************************************************************************************************************************************************


2011-12-28

Crew Intercom

We've all been there, as spectators or participants; a boat is sliding gently into a strange slip or anchorage (or even a familiar one) with one crew member at the helm and one at the bow. With practiced ease, good co-operation and communication aided perhaps by some simple hand signals, the boat comes to a stop under complete control at exactly the right spot to lazily hook the mooring buoy, casually pick up the dock lines or offhandedly release the anchor.......... Huh....wasssup....? Oh Jeez, it was just a dream!

All of us recreational sailors would love the dream to become reality every time (or even most times) we 'park'. For some well experienced crews it frequently does but, somehow, many of us still spend way too much time docking and anchoring in company with that famous Gaelic master-mariner, Cap'n Murphy or his equally well known firefighting friends from Asia! While we are happy to know that, between us all, we have brought a little mirth and merriment into the lives of other boaters as we pursue our goal of realising the dream, we wish it wasn't quite so often.

We Old Matelots certainly know how important practice and experience is in our quest to perfect our docking and anchoring technique but we also know that a little technology goes a long way to help! Enter the Simultalk 24G crew intercom system from Eartec.


http://www.eartec.com

We don't have years of practice and experience with Circe so, for us, effective and low stress helm to bow communication has become a critical component of good boat handling.  We also feel that the spoken, rather than yelled or bellowed, word is the best way to get our messages between bow and helm whilst still preserving our relationship.

Why Simultalk? We did the usual research on line and by way of a dock poll and quickly discovered that full duplex, hands-free systems were the only way to go. There are literally dozens of walkie/talkie systems on offer, many at quite low prices, but there aren't too many full duplex hands free systems. Being able to speak simultaneously, without having to fumble with 'press to talk' buttons with cold and/or wet and/or muddy hands is far better than the alternatives.

A really nice feature of the Simultalk package is the compact and lightweight headset. Competitive systems have bulky headsets that are easily dislodged from the head, can hang up on clothing or rigging and make it difficult to wear brimmed hats or foulie hoods.


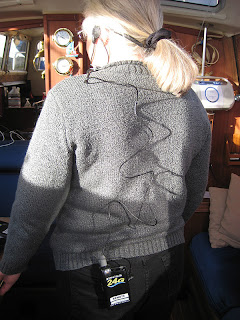
Because there is no need to access a 'push to talk' button, the transceiver can be kept in any pocket or on the back of the belt with the cable run inside or outside the clothing.


The Simultalk system package includes two head sets, two transceivers, two AC chargers........


.........and comes in a handy dandy HDPE moulded case for protection and storage.
Now, we aren't saying that the Simultalk will directly improve our close quarters boat handling, docking and anchoring but, if things don't get better, we will have eliminated one big excuse! 

2011-12-25

Hailing Port ID

In a previous post (USCG Auxilliary) we wrote about the free boat inspection we had and our thoughts regarding ways to minimise the impact of an on-the-water visit from the 'real' Coasties! In that same vein, we are always looking for ways to avoid attracting unnecessary attention through any obvious infraction in either boat or crew appearance or behaviour. One small thing that bothered us was our hailing port ID.

  
Here is Circe hanging in the slings on the day we closed the sale 2 years ago. The hailing port on the transom shows no state ID......Yes, yes, almost everyone on the planet knows that SFO is in California but, in the whacked out bureaucratic world that we exist, the regulations (46 CFR 67.15-3a), and in particular line #6, are pretty clear on the topic:

MARKING OF NAME AND HAILING PORT

"For vessels documented exclusively for pleasure, the name and
 hailing port of the vessel must be marked together in clearly
 legible letters not less than four (4) inches in height on some
 clearly visible exterior part of the hull." (46 CFR ~67.15-3(a))
 Either the homeport or the hailing port may be marked on the boat;
 in either case, the abbreviation for the state must be shown.  
 Name and port may appear on any clearly visible part of the hull; 
 however, they must appear together.
 Any durable, legible method of marking is acceptable, including 
 script lettering.  Name boards are acceptable, if they are attached
 to the hull in a permanent manner.
For example - APPROVED     -- Vessel Name
             Essex, CT     -- Hailingport (town in which you 
                OR            live)
           New York, N.Y.  -- Homeport (nearest Coast Guard 
                              port where your papers will be
                              filed)
Our surveyor had noted the discrepancy in his report but it was a small item, way down the list, so it got ignored until recently. We wondered if the guy from the Auxiliary would flag it during his inspection......he didn't.....but it still bothered us. So, while we had the boat backed into the slip for the recent swim step and transom rehab project, we decided to 'get legal'!  Fortunately, the lettering wasn't painted on, it was a decal, so it was a relatively easy job to put on a new, correct one. 


Here is the hailing port decal as it had been since we bought the boat.


Here the old lettering has been removed with a heat gun and plastic scraper but there is still residual adhesive from the letters on the transom and the effects of UV bleaching can also be seen.


We used acetone and elbow grease to get the residual adhesive off but the effects of weathering were still there. We then wet sanded the whole area with 1000 grit production paper then buffed the whole transom. It wasn't perfect but it's an old boat right? Anyway we reckoned the new lettering would camouflage things pretty well.


We designed and ordered a new decal on line from Speedy Signs in Florida, based on recommendations from folk here on the dock.  They were very quick, we placed the order 12/7 and received it 12/16.


The decal looked good and had a nice heavy transfer layer. Based on some past experience we knew a thick transfer layer makes application a lot easier. Some sign outfits use a thin transfer layer to keep costs down but then the letters want to stay with the transfer layer rather than peel off onto the surface being lettered.


Here is the decal going on. It came with some very detailed application instructions. 


The whole application was very straight forward and the final result was actually better than we expected. The next time we see the Coasties giving us the once over through binoculars we won't be quite so paranoid.

2011-12-23

Superwind Generator

Our original plan to get off the grid has always been to have five separate power source options;  (1) Shore AC, (2) Gas Generator AC, (3) Perkins Diesel DC, (4) Wind DC, (5) Solar DC. The next project on 'The List' was to get a wind generator up and running, so we started to look for candidates. There are numerous wind generators on offer for marine use so our two decisions were to select the best unit for us and decide on the best method of mounting it.

First up.....which generator to buy? After a lot of web research and querying other users here in the 'hood we made a shortlist of two units; the AirBreeze and the Superwind. Both have comparable outputs and features that are extensively documented in their respective promo material and we also found a very informative comparison test report here;


Also interesting was this little Superwind promo video;


The AirBreeze is made in the US and the Superwind is made in Germany (supported through US Distributors). Even though the AirBreeze is reportedly much better than its predecessor (Air-X), has the better price and the larger customer base we finally decided on the Superwind. The popular AirBreeze works well enough but we just felt that, based on everything we could discover, the Superwind blade design would be much quieter in operation. Also, with its almost industrial build quality, we thought the generator unit would hold up better over the long haul.


Next up.....how best to mount the Superwind? Surprisingly, this proved to be the more difficult decision to make. Until fairly recently we had been seriously considering a stern arch as a convenient one-step way to deal with wind generator, solar panels, dinghy and davits, bimini mounts, Lifesling, MOB Pole, spare propane tanks, stern anchor, fenders, GPS and radar antennas plus miscellaneous other items.

Stern arches aren't built from particularly heavy gauge material but their convenience seems to lead people to load them up with mountains of 'stuff'. An arch is certainly an attractive and versatile addition but, by chance, we recently had the opportunity to learn more about the behavior of a stern heavy boat in a seaway........not pretty! We watched at close quarters as a Cal (Lapworth) 35 tackled steep SF Bay chop, with a stern arch and everything but the kitchen sink hanging out back.

The Cal 35 design is very close to a Freeport, with similar dimensions and underbody (except for the rudder skeg) and this one was pitching up and down to beat the band. It made us stop and think about weight distribution. The Freeport is inherently stern heavy, so much so that early boats needed extra bow ballast to sit on their lines and later boats had smaller fuel tanks and lighter galley cabinetry to reduce stern weight. We know how Circe handles with minimal weight (8hp Outboard plus 350lbs of Old Matelots) on the stern, but we wondered what effect +/-800 lbs of extra stern weight (or even more if we had guests on board) would do to her? We've seen plenty of Freeports outfitted for cruising with massive load penalties over the design weight, usually biased toward the stern, with no ill effects reported other than an increase in draft. Even so, we couldn't imagine there was no negative impact, particularly when heading into steep seas.

So, bottom line, we decided to pass on the arch and go with a pole mount for the Superwind. We chose a stainless pole made by Klacko Marine in Canada. Why? Because everything about it seemed very well built and less likely to corrode than powder coated aluminium.....plus the price was right.  We'll leave the dinghy on the fore-deck and deal with mounting our radar and other cruising items as and when we get to them.


Here is the pole support bracket going onto the transom. Note the 1/4" thick stainless steel used for this stand-off. Also visible is the butyl mastic sealing the mounting. We love that butyl....so much better than any of the caulks we've tried.


So that's why we put those cockpit speakers in! Seriously, without them it would have been a nightmare trying to reach the support bracket nuts and washers up inside the transom. The bottom section of the 2.25 inch diameter ss pole is visible at left.

This shot shows the pole socket mounted to the stand-off bracket. Once again rugged and nicely engineered. Unlike other generators, Superwind requires no  rubber vibration isolation in the pole mount. They say Superwind is so well balanced no isolation is needed.....we'll see!


Here is the bottom section of the pole sitting in the socket while we use the Mk 1 eyeball to check for vertical placement fore and aft.........


........and side to side.


Once we were happy that the socket was holding the pole close to vertical we mounted the top pole section and the support braces to find the best position for them. Here is a trial mount of the fore and aft brace. 


In this one both braces are temporarily positioned.  


Another quick eyeball check that things are still nice and vertical then........


......we marked the positions of the upper clamping collars that secure the two braces to the pole. We used painters tape for the vertical position and a pencil mark for the lock screw positions. Then we took.............


..........everything apart again and drilled the pole for the locking screws.


After all the holes were drilled we fitted the locking screws and secured the clamp collars.


At this point we also installed a strain relief fitting in the pole socket.


Once the clamp collars were correctly positioned and secured we re-assembled everything and re-checked the position of the braces. Everything looked good so we secured the upper ends of the braces to the pole and moved on to securing the bottom ends of the braces.


Here is the bottom bracket on the 'fore and aft'  brace being positioned on the starboard gunwale.


This shot shows the bottom bracket and brace assembled and sealed with butyl mastic.


Here is the bottom bracket for the 'side to side' brace. Ideally we wanted to avoid putting fasteners into the cap rail but couldn't avoid it here, without a fancy custom bracket of some sort.


All brackets and braces in place...... everything seems pretty solid!


Now, on to the generator itself. Here are some of the bits and pieces as we unpacked them (blades and charge controller not shown).


Here is the secret of Superwind's success...... according to them! They reckon the unique blade profile makes theirs the quietest and smoothest wind generator on the market.


These little raised chevrons on both sides of the leading edge of the blades are supposed to do something to the boundary air layer passing over the blade which reduces noise........hope so!


Here we've installed a cable clam fitting on the transom and dropped the pole to start feeding the #8 duplex cable. We used #8 to minimise resistance in the long cable run to the controller.


This shows the rest of the pole with the cable partially threaded through. We put zip ties around the duplex cable every couple of feet to stop it tapping against the inside of the pole.


Here we are connecting the #12 generator output wire to the #8 duplex. We coated the crimp connectors with liquid tape, put shrink sleeves over them and finally taped them to a  zip tie 'hanger' (just visible) to take the weight of the cable off the connectors.


This is the goop we used under the shrink sleeves, just a little added insurance.


This shot shows the pole re-assembled and the generator mounted.


Here is a close up of the generator ready for blades and tail vane.


Tail vane mounted, working on spinner and blades.


Generator assembly complete, ready for pole raising.


Here we've tidied up the cable loop at the base of the pole and fitted split sheathing to give it some UV protection.


We mounted the kill switch temporarily in the hole where the old telephone outlet used to be. This whole area will be changed when we build new electrical panels.


Here is the controller and the dump resistors installed.


Ta Daaa.......up and running. Take that PG&E.....who needs you!

Predictably the day we finished the installation there was barely any wind........Duh! There were a few light gusts that got the generator moving for a couple of minutes each time and it seemed very smooth and quiet but we will post a more detailed update shortly with comments on performance, noise and vibration etc.


UPDATE 2-1-2012
Well, this generator is indeed quiet and smoooooth! We literally can't tell if it is running when we are inside the boat. Even when we are in the cockpit there is absolutely no vibration and barely any blade noise, even in 15 knots of wind! There are AirBreeze units on three neighboring boats and we can hear them all. The noise from the nearest one, four slips away, is quite loud. Despite all our pre-purchase research on the Superwind we were still a bit doubtful about the manufacturer's 'whisper quiet' claims prior to installation, but we are believers now! As far as power output is concerned, we think that the 'cut in' wind speed might be a bit higher than advertised....closer to 9 mph than 7.8 mph but, by using a handheld anemometer and our new Xantrex LinkLite charge monitor, we confirmed all the other claims on the published power curve, as far as conditions allowed. Actually, our unit repeatedly betters the predicted 5.4 amps (65 Watts) in the 18 mph (8 metres/sec) gusts commonly felt in our marina during summer afternoons.

UPDATE 4-18-2013
First the bad news....after 18 months of flawless service we had a weird problem with the Superwind. The generator began failing to go into brake mode when the stop switch was operated. The generator and charge controller both were working fine in 'run' but, when 'stop' was selected, instead of hearing the distinct buzzing noise as current was directed to the dump resistors,  and seeing the generator blade speed drop rapidly into a slow idling condition, there was no noise and the generator actually sped up! It had stopped generating electricity but, because the rotor and stator were not being shorted together, it just became unloaded and was just spinning free in the wind. 

Now the good news....the customer service we experienced from Mark Dettmer at Starboard Sun Superwind's Main US distributor, was excellent. The problem was quickly identified as a faulty stop switch (not a Superwind product) and as we were still inside the 2 year warranty period a new switch was quickly supplied at no charge. The Superwind was quickly back up and doing the business! Mark's response was such a pleasant change from the reaction and treatment doled out by some other suppliers of marine equipment when their products develop problems. 

2011-12-19

Inverter Swap

The next step in our electrical system upgrade was the replacement of the inverter/charger. When we bought Circe there was an original US built (1998, pre-Xantrex), Heart Interface Freedom 10 inverter/charger installed. It performed flawlessly ever since we got the boat, unlike some of the newer ones built offshore! The only drawbacks with it were that it is only 1000 Watt capacity and it generates modified, not  pure, sine wave AC output.


The shot above shows the remote control/status panel (centre right) for the Freedom 10. The actual transformer was mounted in the starboard side cabinet, forward of the sofa, in the main cabin. The louvre door in that cabinet helped a lot with ventilation and cooling so we wanted the replacement to go in the same place. We also wanted an inverter that had more capacity and, more importantly, could deliver pure sine wave AC that would cause fewer problems with sensitive and 'smart' devices that we might run from it. 

After some research, the replacement unit we chose was the Sterling Pro Combi  S (above). It is a pure sine wave inverter/charger of 2500 Watt capacity, it's similar in size and weight and has a remote control/status panel like the Freedom 10. The only big difference from the installation standpoint was the fact that the cables on the DC side of the Freedom were secured directly in screw clamps while the Combi S uses studs, meaning the cables must have lugs fitted.

The Freedom 10 came out quickly and easily after we cut the cables on the DC side Here it is ready to go to Blue Pelican marine consignment chandlery in Alameda. It still works perfectly so, with a bit of luck, it should fetch a couple of hundred bucks.


Here is the Combi S ready for installation.


Here we are getting ready to crimp new lugs onto the DC cables....


.....and here it is in place. We had originally considered turning this cabinet into a 'mini bar and booze cupboard' but we'll have to revisit that idea now.


The Combi S remote panel is much smaller than the old Freedom one........


.....so we ran to TAP plastics and got a piece of 1/4" textured ABS sheet and made an adapter plate. The only downside we see is that we now have to open the cabinet to see the  LEDs on the Combi S and know exactly what it's doing. The Freedom showed everything on the remote panel.


Here is a shot of the electrical panels showing the new Combi S controller and Xantrex battery monitor. They will both be relocated when we finish building our new 'hinge down' panels with new breakers and a re-wire. In the meantime we are moving on towards wind and solar charging!