One project that had originally been at the top of our 'must do' list, but kept slipping off the top for a variety of reasons, was upgrading the propane system. From our first inspection of the boat we knew that the propane locker needed cleaning up as it had been used for overflow storage, which is never a good idea, and we also saw that the tank was an antique.....probably original and likely a good candidate for inclusion in the exhibits at the Smithsonian!

Despite the fact that the old horizontal tank was out of certification by years, if not decades, somehow the PO had managed to keep getting it filled. In fact it was full when we took delivery, which was one reason we left it alone for so long. Finally though we emptied it and had to address the problem.
In addition to the obvious age of the tank we now discovered that the supply hose was cracked, the hole where the supply hose exited the locker wasn't properly sealed and the solenoid wiring was a mess! As an added bonus, when we tested it, we found the Xintex sniffer in the cabin was bad and the final icing on the cake was finding the supply hose for the cabin heater had been teed off the stove manifold rather than being run separately from the locker....a big no-no per ABYC codes. Apart from all that, everything was fine!!!
It was at this point we realised we couldn't salvage anything and we would have to replace the whole system. We briefly considered a complete system redesign for more propane capacity by using a couple of vertical 20 lb tanks versus staying with the smaller horizontal tank but finally decided that the amount of effort to neatly install big vertical tanks wasn't worthwhile for us. To do it properly would require a lot of surgery to the propane locker, or a new locker and/or cut down cylinders and/or a loss of storage space and/or hanging things off the stern pulpit. None of that appealed to us so, as our plans don't call for extended offshore trips, we finally decided to keep the horizontal tank set-up but to use all new hoses and components. An added bonus of staying with the smaller tank is the lighter weight and ease of carrying.
It was at this point we realised we couldn't salvage anything and we would have to replace the whole system. We briefly considered a complete system redesign for more propane capacity by using a couple of vertical 20 lb tanks versus staying with the smaller horizontal tank but finally decided that the amount of effort to neatly install big vertical tanks wasn't worthwhile for us. To do it properly would require a lot of surgery to the propane locker, or a new locker and/or cut down cylinders and/or a loss of storage space and/or hanging things off the stern pulpit. None of that appealed to us so, as our plans don't call for extended offshore trips, we finally decided to keep the horizontal tank set-up but to use all new hoses and components. An added bonus of staying with the smaller tank is the lighter weight and ease of carrying.

The first order of business was to yank everything out of the locker. When we pulled the tank out for the first time and looked at the bottom of it we got another nasty shock.
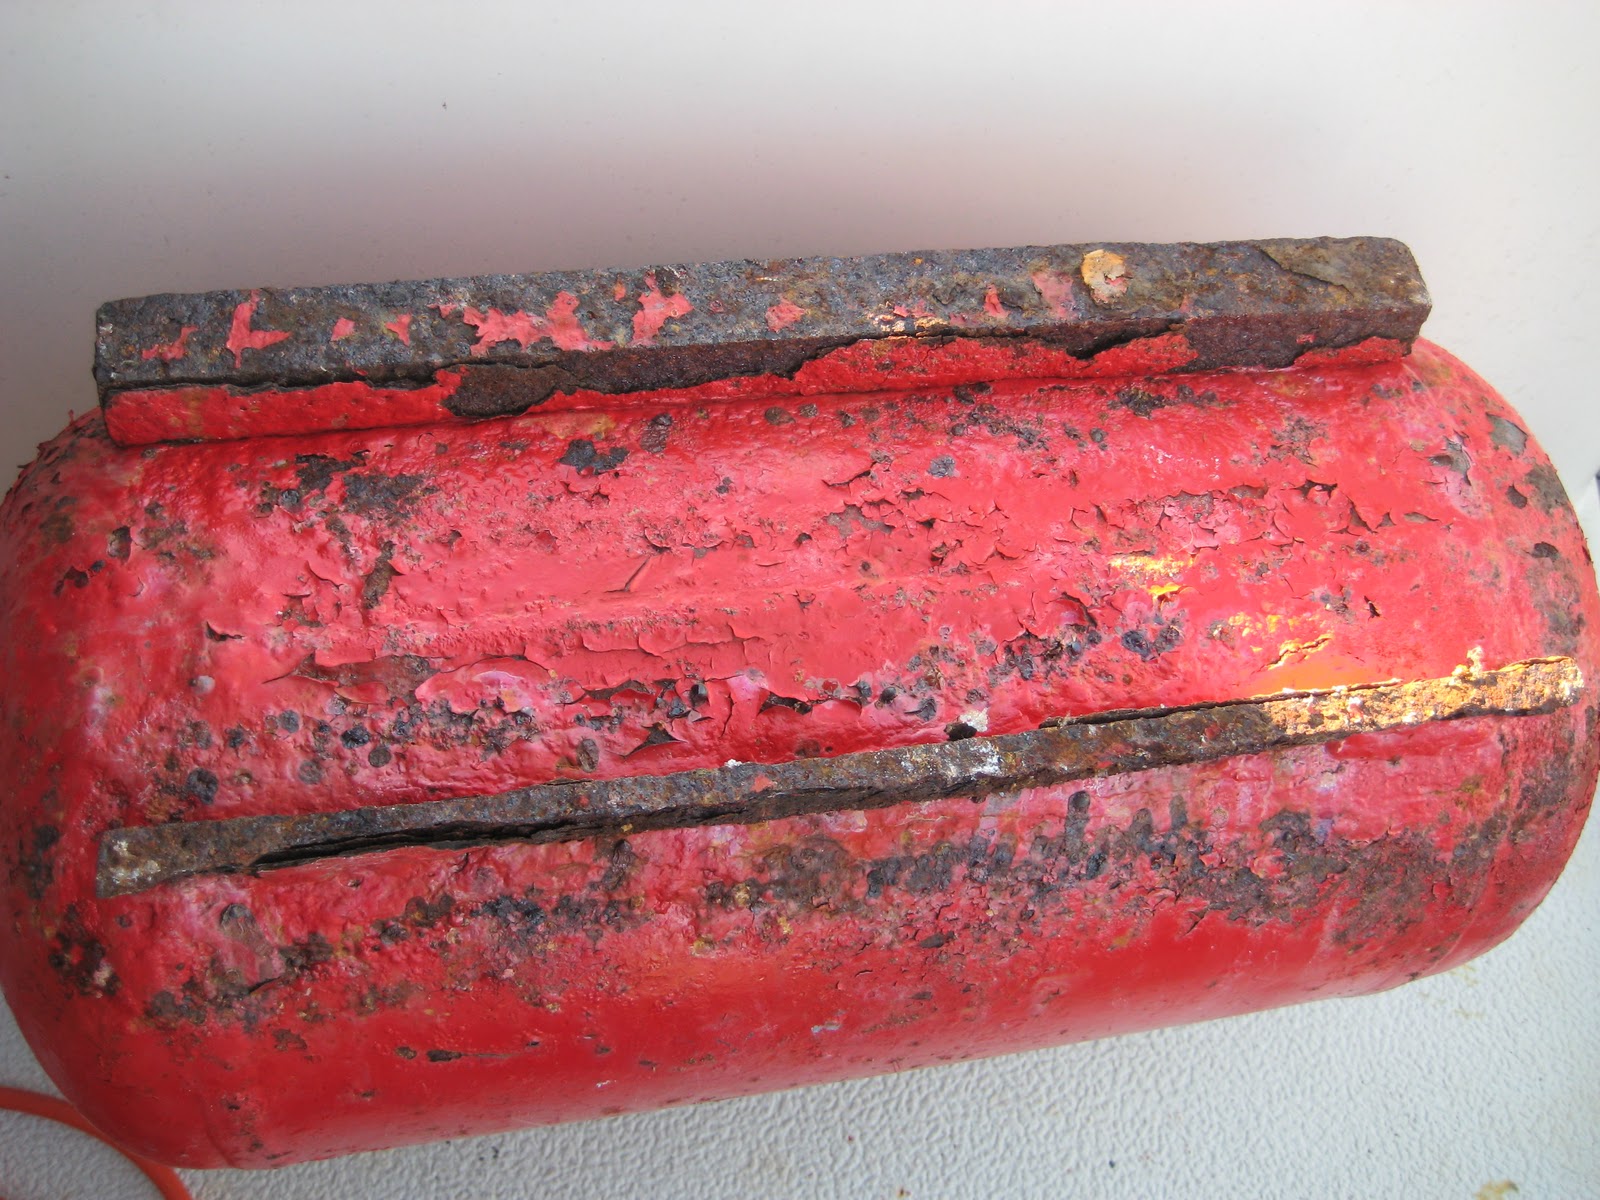
Here is the underside of the tank! The feet were almost completely corroded off and the bottom of the tank body wasn't much better. Severe rust and pitting all over.

Here is a shot of the supply hose showing the cracks due to repeated flexing as the tank was disconnected and re-connected over the years. Also visible is the marginal wiring for the solenoid and the take-off for the BBQ. A Bush League set-up all around.

Here is another shot of the cracks in the hose. They were normally hidden on the underside so until we disconnected it we hadn't realised things were quite this bad.

The tank hold-down arrangement was also pretty cheesy, a short length of genoa track and a couple of Rube Goldberg screw clamps! This shot also shows the supply hose going through the floor of the locker with a couple of blobs of silicone around it. No way was it vapour-tight. There was no sign of there ever being a bulkhead fitting for the supply hose from the factory!

A mix of corrosion, bolts way too long, threads dinged up and loaded with paint & sealant plus very difficult access under the back edge of the cockpit made for a fun couple of hours getting the genoa track out. The hole drilled for one of the genoa track bolts (centre) had penetrated the transom stiffening!
With the repeated trips under the cockpit floor during this step, precious Old Matelot blood was shed....mostly from the scalp... while removing all these nuts and washers and numerous muscle cramps were also enjoyed as legs and arms were twisted into pretzels! There will be no through holes in new hold-down design!
With the repeated trips under the cockpit floor during this step, precious Old Matelot blood was shed....mostly from the scalp... while removing all these nuts and washers and numerous muscle cramps were also enjoyed as legs and arms were twisted into pretzels! There will be no through holes in new hold-down design!

Here we are getting ready to pry the last bolt out of the genoa track. Even with the nuts and washers off, getting the genoa track and clamps out of the locker was a real battle. There was no room under the locker to swing a hammer so each bolt had to be unscrewed, wiggled and pried until it was out far enough to grab with the vice grips.

The paint in the bottom of the locker was rust stained, all torn up from the storage and cracked with age. So, out came the knee pads, trusty heat gun and scrapers and we spent a delightful afternoon cleaning up the locker.

Here is the locker cleaned up and with some of the holes sealed with wooden plugs and epoxy. After we finished plugging the remaining holes we left the epoxy to cure overnight.

After some sanding to knock down the worst of the remaining rough spots we hit the whole locker with several coats of alkyd enamel primer and topcoat. Looks a little bit better now.

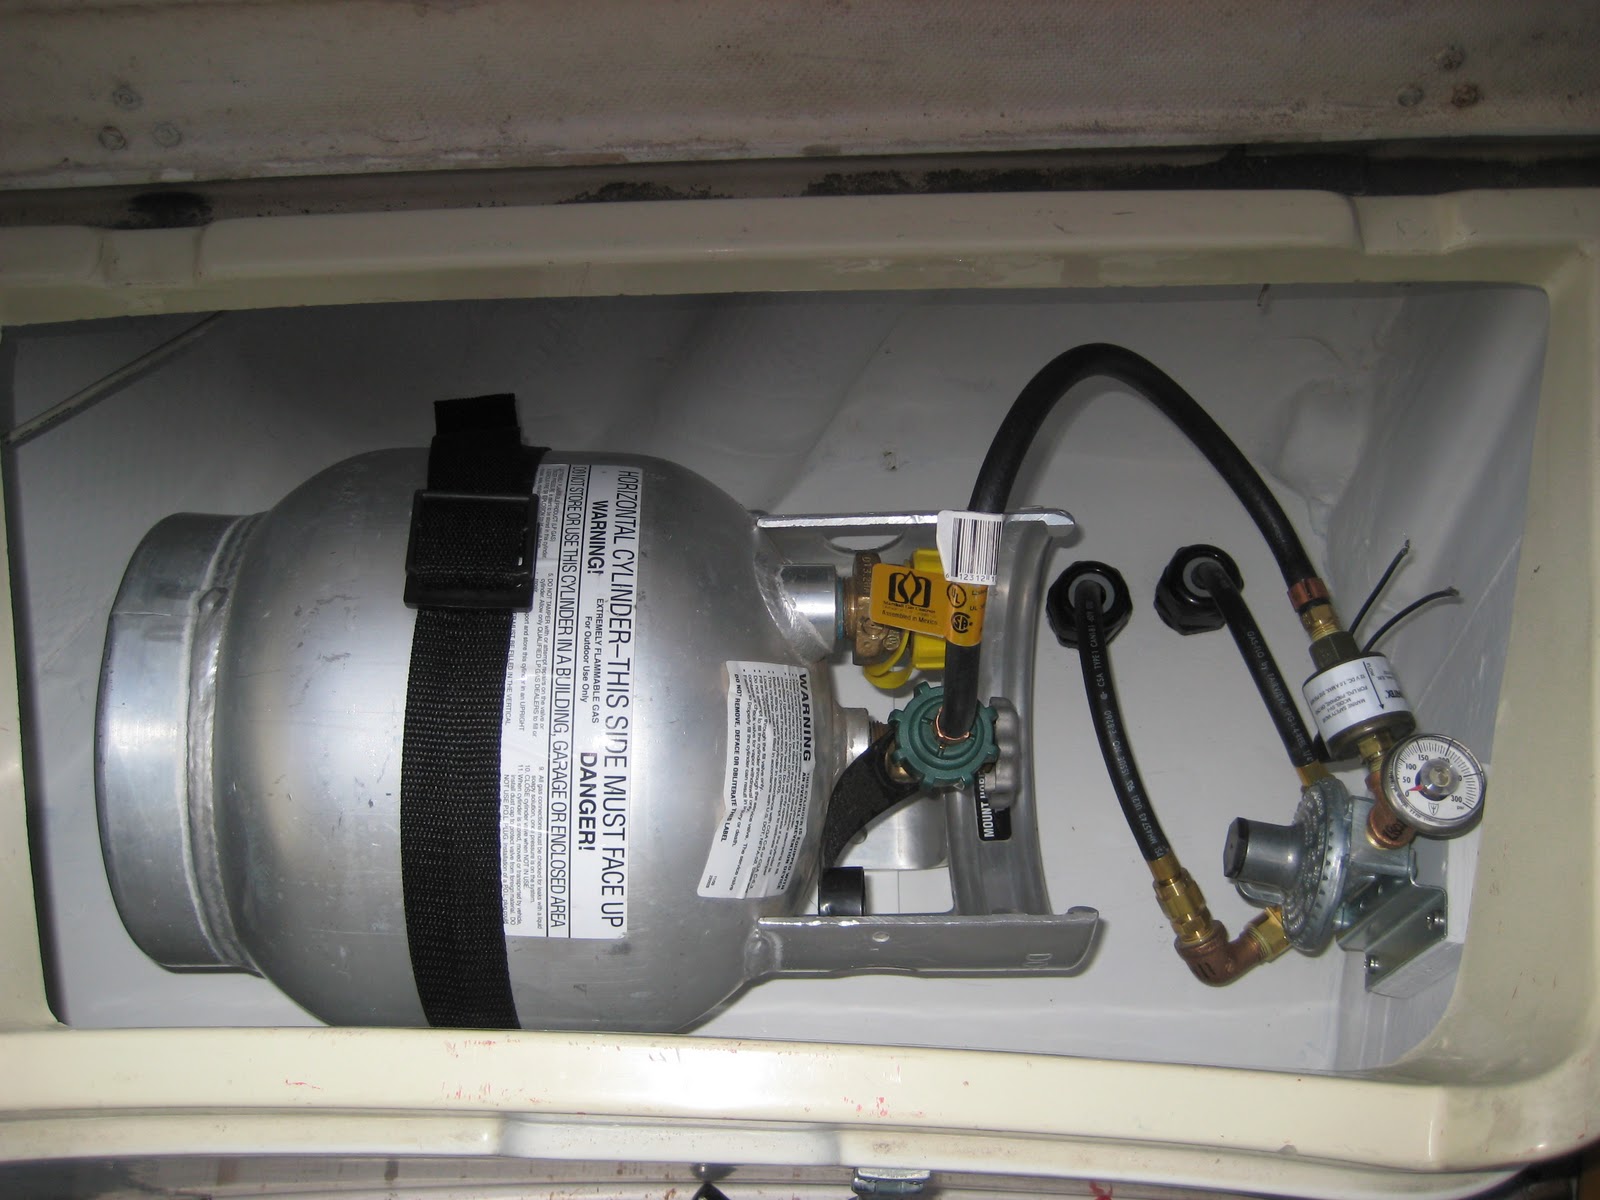
We designed a simplified hold-down for the new 10 lb Worthington aluminium tank. A piece of 3/4 inch King Starboard as a base, some 3/8 inch stainless pins to locate the tank and a 2 inch wide battery strap. It was quick and easy to make, inexpensive and corrosion proof. With no through-bolts, it will be easy to remove without going under the cockpit.
It took a bit of trial and error to find the best position for the hold-down assembly so that we had plenty of clearance for the regulator and supply hoses and still enough room for a hand to go between the tank and the edge of the locker to lift the tank out. After seeing what happened to the old supply hose with the regulator, solenoid and gauge all hanging off the tank, and knowing there would now be two supply hoses, we wanted to limit the chance for hose damage so we got a bulkhead-mounted regulator.
It took a bit of trial and error to find the best position for the hold-down assembly so that we had plenty of clearance for the regulator and supply hoses and still enough room for a hand to go between the tank and the edge of the locker to lift the tank out. After seeing what happened to the old supply hose with the regulator, solenoid and gauge all hanging off the tank, and knowing there would now be two supply hoses, we wanted to limit the chance for hose damage so we got a bulkhead-mounted regulator.

Just visible (lower right) is the mounting pad for the new regulator epoxied onto the side locker wall. The tank pigtail will now be the only hose being moved around for tank changes.

Here is the new bulkhead mount regulator and fittings going in for a trial fit to find the best position for the supply hoses. With the exception of the Trident 300 psi gauge that came from Defender, we bought all the other hoses, gas control parts and fittings from RV and other non-marine sources and saved at least 50% over WM and local chandlery prices! RVA in Denver was a particularly good source.

After a lot of research on pipe thread sealants and ptfe tapes we settled on Rectorseal #5 from our friendly local True Value store.

This stuff isn't the easiest to work with but its the gold standard for pipe dope.

After the trial fit of the regulator, and with all the clearances identified, we were able to put in two new exit holes for the stove and heater supply hoses.


More fun filled time was spent, again, twisting Old Matelot bodies into pretzel shapes under the cockpit floor to get everything sealed and installed but the spacers worked perfectly.

Here is a shot of the first trial fitting of all the various pieces. There will be vapour tight bulkhead fittings on both supply hoses.


We chose Ancor stainless, cushioned hose clamps. A lot more effective and secure than zip ties, not to mention a lot more professional looking.
To make our lives complete, while we were under the cockpit we also saw signs that the rudder stop beam may have been moving slightly, visible above at bottom right of the photo. We also saw that the e-tiller access cover had been leaking, causing corrosion of the steering quadrant. Just what we needed, more projects for our list!!!!
Here is the whole new system in place, ready to wire the solenoid and pull the new supply hoses through into the cabin. Check back with the first photo in this post for the 'then & now' comparison.

Here is the area behind the stove showing the old stove supply hose (left) and the heater supply hose (bottom) that had been incorrectly teed together off the stove manifold. ABYC codes require a separate supply hose from the tank locker to each appliance on the boat, with no joints inside the cabin.

Here is the new stove supply hose pulled through to the galley. After the bulkhead grommet is installed it will be ready to connect.

Here is the hose grommet in place ready to put the stove back.
We taped the new heater supply hose to the end of the old one and pulled it through to the heater....quite a chore in itself.....and hooked it all up. We temporarily wired the solenoid directly to a breaker for testing and everything worked fine. A tough project but we now have a lot more peace of mind regarding a critical system! Next up will be the sniffer replacement. Stay tuned!