The Old Matelot


matelot;
noun,
sailor; from the French mat-el-oh (plural matelots)
A slang expression, chiefly in Britain, may also mean mate or companion.

Welcome to the Old Matelots' blog, my first (and probably last!) journalistic endeavour. Watch its development and evolution as I make the transition into retirement and the live-aboard, off the grid lifestyle on the sailing yacht, Circe. Follow my fortunes (and misfortunes) in the posts as I work to rehabilitate my home on the water.

UPDATE - Due major back-to-back relationship and health issues during 2017 & 2018 I was involuntarily beached and forced to let Circe go. The blog will remain up for the foreseeable future for informational benefit to other owners of these magnificent boats.


*******************************************************************************************************************************************************************


2011-11-30

Smart Plug Conversion

A funny thing happened at the dock one morning this week. Right in the middle of breakfast we suddenly lost shore power and the inverter kicked in. The AC main breaker on the boat didn't trip but the 'reverse polarity' light came on. A quick check of the breaker on the dock showed it hadn't tripped and suggested a problem in the shore power cord. There was!

Oops!
The interesting thing about this failure is that we had already planned to replace the Marinco twist lock plug and receptacle with a Smart Plug unit, it had already been ordered and unbelievably it showed up on the same day the Marinco failed......timing is everything!


The scary thing about the failure is that we always check the Marinco set up weekly for any signs of prong corrosion or discoloration due to overheating and saw nothing to hint at a problem developing so, clearly, our inspection regimen wasn't worth a hill of beans! The only two things drawing AC power at the time of the failure were the water heater (Seaward) and a small space heater, both of which are 1500 Watt rated. We knew that those two items alone could draw close to 25 Amps for short periods (if the water heater cycled while the space heater was on 'high') but we have operated them together for many months with no problems and felt that we had enough of a cushion in terms of supply capacity at 30 Amps. We may have to reassess that assumption but, even if we did momentarily exceed the system capacity, we should have been popping overloaded breakers not melting hardware.

The reason we checked the shore power connections so frequently and had a replacement on order is that the Marinco/Hubbel type twist lock plug and socket arrangement is a very old and fundamentally weak design. Despite dominating the marine market they aren't waterproof, the exposed contact prongs on the plug are easily damaged, the prongs don't provide solid engagement and the plastic locking ring is easily cross threaded or broken. Failures of this type of plug and socket are quite common. As full time liveaboards we use a lot of AC power from the dock supply and so there is a lot of thermal cycling through our shore power cord that can accelerate corrosion and  loosen wire clamp screws, either of which can cause a failure like the one we experienced here.

By way of contrast, the Smart Plug addresses all the shortcomings of the twist lock design plus it is less susceptible to wear or damage to the contact prongs. It is a great product. There is an excellent video on their web site that steered us through each step of the installation.


Countersinking and cleaning up the nasty factory drilled mounting holes that we have come to expect. As an aside, we have been searching for a nice looking blanking cover for the (disconnected) telephone inlet sitting below the AC inlet, but so far no luck. We will probably end up making something out of Starboard.


The replacement of the female receptacle was very easy. The Smart Plug mounting screws are exactly the same pattern as the twist lock receptacle and after cleaning the old sealant off the cockpit wall, the Smart Plug receptacle was quickly mounted. Once again we used butyl mastic around the mounting screws for sealing. 


Here is the finished receptacle mounted to the cockpit wall. Notice the sturdy contact prongs, well protected in the recessed body, and the double lipped seal inside the hinged cap.  


Here is a shot of the closed receptacle. Clean and tidy.


The male side of the Smart Plug was a bit more fiddly, in particular getting the sealing sleeve into the plug body and over the cord, but we got it after only one false start. This shot shows our goof...the sleeve should have been fitted into the plug body before sliding it onto the cord. 


We got it right on the second attempt. 

Getting the three conductors into their respective slots was also a fiddle because the big molded cord clamps get in the way. Patience is a virtue for this bit!


UPDATE - April 2017

On later versions of the Smart Plug the integral molded cord clamps have been replaced  by a separate clamp bar with screw fasteners that is much easier and simpler to use.  


Here is the completed plug assembled onto the cord.


Here is the finished conversion. We did the whole job in around an hour, including the two attempts at getting the sealing sleeve onto the cord and a short tea break. We will sleep a little more soundly knowing this conversion has been done.


2011-11-28

Cap Rail part deux

The last piece of  the cap rail to be re-finished was the short strip on top of the fold-down transom swim step. We had left it until last as we knew we would also need to re-finish the teak swim steps themselves and the transom side trim at the same time so, as soon as the new lifelines were installed, we started in on it. 

We had always known that the swim step wasn't perfectly aligned with the transom and tended to hang up, but we hadn't looked at it closely and thought it was the woodwork binding. We planned to fix it while we were sanding the central piece of cap rail. However, when we carefully examined the step, we saw some things that sent us off in a couple of new directions........maybe this post should have been titled 'Transom rehab'! 

This shot shows the misaligned swim step, almost 1/4", but a close look shows the 'gotcha'....the barrel bolt is perfectly aligned! After a lot of pulling and pushing we forced the step into correct alignment, but only by literally jamming it in place. More disturbing was the fact that we found the cap rail wood had plenty of clearance. 


This shot shows the step correctly aligned, but only after forcing it into place. Now look at the barrel bolt! 


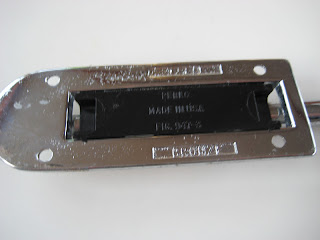
This close-up shows the position of the barrel bolt with the step correctly aligned. Both bolts had the same problem, showing they were obviously assembled with the step out of alignment at the factory. After finding the swim step wouldn't line up properly with the transom the barrel bolts were just installed to suit ....cute huh!


So, if the cap rail wood wasn't causing the problem what was? We used a piece of paper as a feeler gauge and soon discovered that the actual swim step molding was too wide and was jamming against the transom on both sides.

The edges of the step needed to be eased off by around 1/32" on each side. Obviously, removing that much material would destroy the gel coat on the edges of the step.....maybe that's the reason why nothing was ever done to fix the problem? 


Repairing the gelcoat along a narrow strip like the edges of the step molding is probably the easiest gelcoat repair to make, because it is completely hidden most of the time, so it shouldn't have been a big deal to fix it at the factory.......but what do we know! Anyway, it had to be fixed so out came the 'mouse' sander and we tore right in. 


Not surprisingly the factory gelcoat was quickly stripped off by the sanding but after a few minutes work the step now closed smoothly into perfect alignment with the transom.


Of course, the barrel bolts were now misaligned, so they had to be removed and repositioned. Here we are pulling them off and....Lo and Behold...... under the one on the starboard side we discovered another factory 'adjustment'. A 1/16" shim had been glued to the transom so the bolt would line up with the misaligned swim step!!!!


Here we are trying to get the shim off the starboard side of the transom without damaging the gelcoat. For some reason there was no shim under the port side barrel bolt?


When we got the two barrel bolts off we found that the plastic anti-rattle blocks were broken on both of them. After 30 years we really can't complain about them failing. None of the distributors we contacted carried just the anti-rattle block so we ordered some replacements directly from Perko Marine.


While we were waiting for the anti-rattle blocks we stripped and oiled the teak trim on the inside faces of the transom.


In a very unusual development Perko Marine shipped the replacement anti-rattle blocks free, gratis and for nothing.......excellent customer service. New block shown at top and old broken one at the bottom.


Here is one of the new anti-rattle blocks in place under a barrel bolt.

Because the base of the barrel bolts aren't wide enough to completely cover the old mounting holes we will fill them and maybe use a thin cosmetic stainless shim to make things look presentable.


Here is the repaired and repositioned swim step and barrel bolt on the starboard side........


......and the port side. Everything nicely aligned and looking good. And now for the the next piece of bad news, because we had re-aligned the swim step to the transom .....


........we had created a big mismatch in the stern rails. Originally installed to match the misaligned swim step, the error at the rail was now magnified due to the greater distance from the swim step pivot. The 1/4" error between the edge of the swim step and the transom had grown to more than 1" up here at the top rail!


We were too embarrassed to post a pic showing how we used a come-along and a webbing strap to 'encourage' the stern rail halves back into alignment with the swim step, but that's what we did..... and here is everything back together.


Over time, the retaining sleeves on the stern rails had become deformed and were very loose, so we used  large hose clamps to squeeze the sleeves back to the correct shape. General wear and tear had also resulted in the 5/16" holes for the sleeve locking pins becoming misshaped and enlarged. We re-drilled the holes to 3/8" for bigger pins.


We weren't too keen on the existing 5/16" 'ball-lock' pins (left) because they are hollow, for the push button feature to work, and they tend to freeze up and/or bend. When we upped the hole size we went with 'fast-pins'  (right) which are a solid shank design that is much stronger and has no internal mechanism to cause problems.


She's starting to look a bit like a boat again!


Now....finally...... we were ready to start refinishing the last piece of teak cap rail and swim steps! While we were at it we also replaced the two swim step tether cables.


We used 1000 grit paper and wet sanded the inside gelcoat on the swim-step molding then finished up with polishing compound and wax. There were a couple of small 'divots' in the gelcoat but nothing too terrible......it's an old boat!


All the swim-step woodwork was stripped, cleaned, sanded and oiled  using the same method detailed in the earlier cap-rail post. This shot, taken after the top rail had been removed, shows how much cap rail wood had been sanded away over the years! Evidently the top rail over the swim step had never been removed before!


It was a real pain stripping the old varnish and sanding, because of all the weird corners, angles and cut-outs on the steps, but we persevered and it turned out looking pretty good, everything considered.


What is really nice is that deploying the swim step is now a one person, one hand job rather than two people, four hands and lots of cussing! On to the next project.

2011-11-09

Cap Rail

As part of our recent deck hardware re-bedding project we refinished some short sections of the teak cap rail at the bow where the pulpit mounting feet are bolted, and midships where the  mooring cleats are located. We didn't varnish it, as that would have taken too long, but we stripped, cleaned and oiled it. Not surprisingly, those refinished sections really showed up the rest of the rail, which we have admittedly neglected while trying to decide whether to keep it or replace it with an aluminium toerail. So, having shamed ourselves into action with the re-bedding project we decided to refinish the whole rail using the same methods. 

Readers who have followed our blog for a while know that the cap rail has been a sort of 'bete noir' for us.......we like the look of the teak rail but not the maintenance that goes along with it.....so it has been neglected in the extreme. We keep looking at it and agreeing something should be done but we never seem to actually do anything. We soothe our consciences by telling ourselves we are too busy with all the 'more important' projects we have in process.

We have seen several other Freeports that have replaced  the teak cap rail with a slotted aluminium toe rail like the Islander 36 which we think looks excellent, requires no maintenance and is much more practical than the decorative teak cap rail. Ideally we want to make that change, re-sealing the hull-to-deck joint in the process but, unfortunately, it is another major project that we can't justify at present with everything else that we are doing, so stripping and oiling the cap rail is our short term concession to aesthetics pending a final decision on the toe rail conversion.


Here is a 'before' shot of a section of the cap rail on the port side of the cockpit (.....blush!). It is very representative of how the whole cap rail looked when we started the hardware re-bedding project.


This is how the cap rail looked after we finished caulking it and re-bedding the midship mooring cleats. You can see why we were shamed into action!


Between the two sides of the boat, plus the stem and the stern, there was over 75 feet of cap rail to deal with. To make things a little more manageable we decided to divide each side of the boat into 6-8 foot lengths and treat the rail in sections.


Here are our 'tools of the trade' that we used for the stripping, cleaning and oiling of the rest of the cap rail.


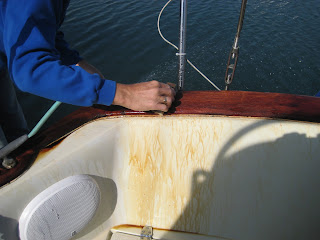
Step one is the stripping of old varnish using the heat gun and pull-scraper. It is tough to keep the scrapings out of the water (which is a certain nasty-gram from the harbormaster) so we made a 'catch bag' out of a piece of plastic drop cloth taped to the side of the hull. 


Here is a shot of the 'catch bag' we made to stop too much debris going into the water. It wasn't perfect but it caught most of the scrapings.... and it's the thought that counts right?


We were a bit surprised at how much of the old varnish lifted off in big sheets. Evidently it wasn't adhered nearly as well as we thought it would be.


Here is a shot showing a stripped section of rail (right) up against a section with the old varnish.


OK, ready for a detour? Of course you are, it wouldn't be an Old Matelot project without a horror story attached would it? We found this cap rail screw lurking close to the starboard aft mooring cleat. Seems that the counter-bore  for the screw was originally cut too shallow and the cover plug was so thin it got sanded away over the years. Predictably nobody had tried to fix it.


We stripped all the surrounding varnish, took the screw out and tried to scare up a 1/2" Forstner drill bit to cut the counter-bore a bit deeper. We only had 3/8" and 1/4" sizes so, rather than taking the time and expense to go and buy one we used the mighty Dremel and improvised.


Fortunately there was enough room to use the cutting guide to control the depth of cut so, with a steady hand we were able to make the counter-bore a little deeper.


We only went deep enough to get room for a thin plug to fit, we didn't want the counter-bore so deep that it would break through at the bottom of the rail and render the screw useless.


Here is the new 1/2" plug inserted about 3/16"deep. Not ideal but adequate for what we needed.


A quick hit with the sander to level the plug and.......


.......we are back on track.


Finally we get to Step two in the cap rail re-finish project, which is a quick run over the stripped area with 180 grit production paper to knock down any small flecks of varnish that might have been missed by the scraper.


Step three is to wet the whole stripped area in preparation for applying the two part West Marine teak cleaner. 


Here is the Part 1 cleaner being applied. When using the WM teak cleaner, follow the directions very carefully. The 'Part 1' stuff is very good but if it is left on too long, scrubbed too vigorously or with a brush that's too stiff or allowed to dry out before rinsing, it really raises the grain of the wood.

Here we are gently scrubbing the cleaner into the wood. It's almost scary the amount of junk that is drawn out by the Part 1 stuff. As it can stain gel-coat, all the the grime must be rinsed off quickly and thoroughly, before it dries.


Here we are repeating the process with the Part 2 cleaner. Same routine, gentle scrubbing and prompt rinsing. 


After the rail is completely dry, Step four is to protect the hull and deck with a couple of layers of painters tape and then sand thoroughly with 180 grit production paper followed by 220 grit to finish. The tape is a good idea because it is easy to slip off the cap rail and scuff the gel coat when sanding close to the edges. (Don't ask how we know this!)


Step five is to wipe everything over with acetone and, if you wish, a tack rag.


Step six is to slather teak oil all over, leave for 10 minutes and wipe off the surplus. Let stand for 15-20 minutes and repeat. Alternatively, apply the first coat of your choice of varnish if that is your preference.


Usually, on raw wood, the first couple of oil (or varnish) applications are quickly sucked right down into the wood fibres, so at least three or four applications are needed for the best results.


And that's all there is to it. Repeat as necessary until all sections of the rail are refinished!. Here is a shot of the oiled starboard side cap rail.....looking better than it has in a year. On to the next project.