Unless ordered with a custom 'de-watering' system, or some product-specific bilge pump arrangement, Freeports usually left the factory with two PD (Positive Displacement) diaphragm pumps, one manual and one automatic. Pump models varied but typically the manual pump was a bulkhead mount Whale Gusher 10, located in the wall of an aft cockpit locker and the automatic one was usually a Jabsco 5.5 or 8.0, mounted under the galley sole directly above the bilge/keel cavity.


Manual bilge pumps are almost always diaphragm style but using a diaphragm design for the automatic pump was dictated by the deep bilge in the Freeport. Depending on loaded displacement, it can be more than 5 ft from the bottom of the bilge to the waterline, and with another couple of feet for an anti-siphon loop there's a lot of head pressure for the pumps to overcome. The performance of all pumps deteriorates with head pressure but diaphragm pumps perform much better than non-PD pumps (centrifugal etc.) for lifting large heads of water.
Depending on model, the Jabsco automatic pump was rated at either 330 or 480 gallons per hour (GPH) and the Whale manual pump at almost 1000 GPH. (We always thought that latter figure was very optimistic, requiring continuous pump operation at +/- 70 cycles per minute.) Anyone who has operated such a pump at such a rate will know that even 50 cycles per minute is very difficult to sustain for extended periods......even in panic mode. In the Freeport we think the realistic continuous average manual pump output, for a shorthanded crew, would be closer to 700 GPH. Bottom line, even with ideal conditions and plenty of fresh crew to operate the manual pump, the total theoretic de-watering capacity of the standard factory arrangement was less than 1500 GPH.
Clearly, the factory two pump set-up was pretty basic. It was adequate for nuisance drips coming through the stuffing box or rudder post and water draining from the anchor locker or rain water getting down the mast, but not for anything more serious. Further, there was no alarm for pump-running or high water in the bilge to provide an early alert to a developing problem. Over the years many Freeport owners realised there was a lot of room for bilge pump improvement and made various upgrades and additions. There is an interesting article here highlighting the issues in determining adequate pump arrangements. We've often discussed ways to improve our set-up but, like so many things, priorities kept changing and bilge pumps fell down towards the bottom of the 'list'.
When Circe came to us there was a Rule High Water Alarm fitted, seen here, top of the pic. Having the alarm was a good thing, but it was set much too high in the bilge. It was up near the prop shaft so, if the automatic pump failed or was overpowered by a severe leak, the bilge would have been almost full of water before the alarm would trigger.

Also, at some point, Circe's Jabsco diaphragm pump had been replaced with a Rule-Mate 2000 centrifugal pump. Why? To get additional capacity? We've heard some horror stories about reliability issues with the integral float switch on this Rule-Mate model but we've always checked our pumps regularly and ours had always worked well. At first glance, the 2000 GPH rated capacity seems to be a significant improvement over the Jabsco, but some investigation showed the substitution wasn't that straight forward.
The physical design of the Rule-Mate pump base and the slightly concave shape of the bottom of the bilge was such that the pump lost its prime while there was still almost 2 inches of water standing in the deepest part of the bilge. When the pump stopped, with no check valve in the discharge hose, all the water from the pump and hose, up to the turn of the anti-siphon loop (approx 8 ft), would drain back down through the pump, adding to the water already left in the bilge. It wasn't enough to re-trigger the pump but it gave us a much wetter bilge than we wanted.
As noted previously, diaphragm pumps are much better at lifting water than centrifugal ones so after checking a couple of pump performance charts we estimated that, sitting so far down in the deep Freeport bilge, our Rule-Mate 2000 pump was effectively de-rated by almost 50%. Using our earlier guesstimates of 700 GPH for the Whale manual plus the Rule-Mate automatic, de-rated to +/- 1000 GPH, we saw that 1700 GPH was likely a fair estimate of our true pumping capacity........better than the original factory set up but not by much.

The Whale manual pump is located high above the waterline in an aft cockpit locker. It has a long feed hose from the bilge (+/- 14 ft) and a short (+/- 3 ft) discharge hose. The discharge is routed to a stern through-hull on the port side (upper through-hull in pic). The through-hull and pump positions in this arrangement create a natural anti-siphon configuration and it all works very well. We saw no need to change much in the manual pump system.

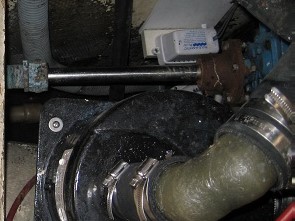
In the original factory set-up, the discharge hose from the Jabsco automatic pump had been routed to a through-hull right at the waterline close to midship on the port side.

Here is the inside view of the factory discharge through hull. Our substitute Rule-Mate pump discharged to the same point, but the big difference was the very long (+/- 12 ft) discharge hose, most of which was uphill. From the bottom of the bilge to the top of the anti-siphon loop is 8 feet, a lot of work for a centrifugal pump.

What to do? We had a new(ish) check valve laying around and as a quick fix we could have put it in the Rule-Mate discharge hose to stop the drain-back problem and re-positioned the high water alarm deeper in the bilge for earlier warning in case of a problem. However, just doing that wouldn't address the reduced overall pumping capacity and wet bilge problems. Also, we're not keen on putting any restrictions in the system that might fail, and check valves are notorious for leaking and clogging. Finally we decided to bite the bullet and re-engineer the whole automatic side of the de-watering system.
We briefly considered reducing the depth of the bilge by using Sea Cast or polyurethane foam to fill the bottom 2 ft and glassing it over, leaving a small 'collector' sump at the back end. It would certainly make a new pump system more efficient, but it would also significantly reduce our time cushion in the event of a serious leakage problem. Also, with the engine exhaust hose, the water-lift can, the transmission, the prop shaft and the PSS all in place it would be a real challenge to get down there to do all the necessary filling and glassing, so we abandoned that idea. If we ever get round to re-powering the boat, or pulling the Perkins for some reason, we may revisit it. With the motor out, the engine room and bilge area would be clear for easy working access for the project.
In the end we decided on a three step approach; 1) Install an additional small diaphragm pump to take care of the usual nuisance drips and keep the water in the bilge to a minimum. 2) Re-position the Rule-Mate pump much higher in the bilge. This would reduce the head it had to overcome and restore some lost capacity for the few occasions (hopefully none!) when some serious water removal is needed. 3) Drop the high water alarm switch further down in the bilge to give us true early warning of problems.
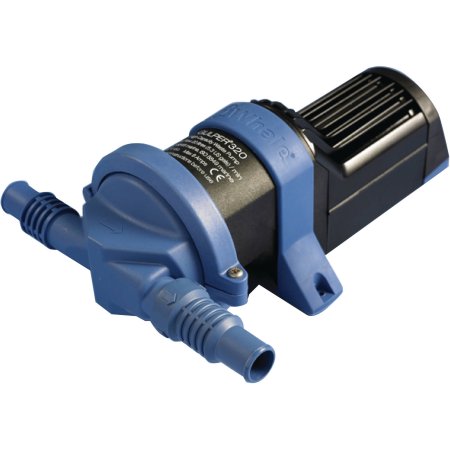
We chose a Whale Gulper Model 320 as our new primary bilge pump, to be located above the keel cavity where the factory Jabsco had been. It would need a long pick-up hose to handle +/- 40 inches of suction lift and with another +/- 36 inches of discharge head its capacity would be reduced to approximately 260 GPH. We have two other Whale Gulper pumps in other places on the boat and have always found them extremely reliable, durable and easy to work on.

The new pump would also need a new switch located at the bottom of the bilge. As all our past experiences with mechanical and mercury float switches have been generally bad we thought it was time to try something different. After some research we settled on a solid state design. Here is the Water Witch Model 230, a bit pricey but fully encapsulated and with no external moving parts to jam. We are interested to see how it holds up.....time will tell.

Welcome to our workshop! To suspend the Water Witch way down in the bilge we used 1.5" aluminium angle to build a long 'wand'. We designed it to do double duty as a support for the new pump pick-up hose and strainer.

Here is the first test fit of the wand. It will fasten to a mounting point on the start battery shelf over the PSS shaft seal. We wanted it to be quickly and easily detachable (QD) so we built it with slotted mounts and hand knobs. ( Yes....we really need to paint the bilge!)

Here's another test fit. We've got the wand length set and riveted the mount to the wand. Visible are the mounting slots and one of the hand knobs.We epoxied a 6 x 6 x 3/4" plywood stiffener under the shelf to receive the 1/4 - 20 stainless hanger bolts we used for the mounting knobs.

Another part of the QD feature was a way to easily disconnect the pick-up hose from the pump. In an emergency we don't want to be struggling with hose clamps to clear plugged hoses. We used an off the shelf connector from our local ACE Hardware store and fitted two 3/4" x 3/4 NPT hose barbs.

Here's a view of the assembled coupler.

To keep the whole wand assembly as compact as possible to easily slide up past the prop shaft we wanted a skinny vertical pick-up strainer. All the strainers and strum boxes we saw on line were either too big, had side entry, had integral check valves or were too expensive. Back to ACE Hardware. For less than $10.00 we got two PVC end caps, two bushings and two nylon hose barbs. This was enough for two DIY strainers, 3/4" for the new pump pick-up and 1 1/8" to replace the existing manual pump strum box, which was a clunky side entry design. We saw that with a vertical entry strainer we could chop over a foot off the manual pick-up hose.....less junk in the bilge.

After 10 minutes with a 3/16" drill, a little pvc pipe cement and some PTFE tape we ended up with these.

We even shot them with some 'Krylon for plastic' that we had laying around, to match the black bilge hose.....no cosmetic expense spared for s/v Circe......!

Here is the finished wand with switch, strainer, hose and QD coupler. It's 38 inches long!

Another view, looking at the base of the wand. So much for cosmetics....after only a couple of test 'in-out' cycles the paint was already scuffed....sigh!

In this one the wand is finally located on the shelf. The rotating pump-head feature on the Gulper made hose alignment a snap and we could start hooking things up.

Here we took the opportunity to re-route the wiring of the existing Rule-Mate pump and consolidate it with the wiring for the new pump and switch and the LED light stick (top of pic). The coil of wire shoved behind the light stick is a 6 ft roaming cord which lets us instantly unclip the stick and take it anywhere in the engine bay.

We routed the discharge hose from the new pump under the galley floor and back to a new discharge point under the cockpit above the heeled waterline. To keep the hose run tidy and eliminate the need for secondary elbows, reducers and barbs we looked for a simple 90 degree one-piece through hull design. We found these on Amazon and got two, one for the Whale (3/4") and one for the Rule-Mate (1 1/8"). Both discharges will be routed to the same area.

Here we've installed backing plates for the new 3/4" through hull (Whale pump discharge) and the re-routed 1 1/8" (Rule Mate discharge) . We made them from 12 mm Hydrotek and fixed to the hull with thickened epoxy. The Gorilla Tape is to stop any sagging while the epoxy cures.

In this one we've removed the Manual pump discharge hose for better access, cut the new through-hull holes and saturated the backing plates with Smiths penetrating epoxy.

Here, everything is assembled and hoses connected. We bedded the through-hulls with 3M 4000UV.

Here we've mounted a second control panel (bottom) for the new pump. We reluctantly matched the existing (top) panel for continuity sake, even though we have found those stalk style switches are vulnerable to accidental operation.....aka butt bumps....at the nav station. With everything connected, the first stage of the bilge 'de-watering' system upgrade was complete.

Next we started looking for ways to combine the relocation of the existing Rule-Mate pump and the high water alarm. After doing some measuring we could see that the size of the alarm float switch would make it difficult to combine the switch and pump on a single bracket that could easily be removed up past the prop shaft. We decided to replace the clunky, caged alarm switch with a smaller one.

If we had more experience and confidence with the Water Witch it would have been a logical choice.....common parts etc.....but as we didn't know how that would turn out we just picked up a cheap uncaged float switch for the alarm. The integral float switch for the Rule-Mate pump is caged and that's what really matters. Using some Starboard off-cuts we lengthened the hanger plate by 6" and, by adding an under-hanging extension, modified the old alarm switch bracket to carry both the pump and the new alarm switch .

Here's another shot of the modified bracket and generic float switch. The Water Witch switches aren't cheap and since buying one we've read a couple of reviews where cracks in the potting material and corrosion of the contact pads have caused failures in service. So, we didn't want to buy another one for the high water alarm until we were sure it would hold up for the long haul. We designed the bracket so a second Water Witch can be fitted at a later date, if our experience with the first one is good.

Here is another ACE Hardware coupler and hose barbs, this time 1 1/8" for the larger discharge hose from the Rule-Mate pump.

Here's the modified bracket holding the Rule-Mate pump and high water switch lower down in the bilge. Hand knobs again to secure it. The QD coupler in the Rule-Mate discharge (white) hose is top centre of the pic. The edge of the QD coupler in the Whale Gulper pick-up (black) hose is just visible between the switch wand and the Rule-Mate hose. The pick-up for the Whale Gusher manual pump (gray corrugated) hose has been re-routed to the front of the bilge.

Here is a slightly different angle. Things aren't as close together as they appear. The Rule-Mate pump is approx 12 inches below the prop shaft and the high water switch is further down below that. The Whale wand and the Rule-Mate pump can be removed for inspection/cleaning/repair in less than 5 minutes......without tools.
The Rule-Mate pump had originally been plumbed with some heavy Shields #148 hose that made it a pain getting through tight corners en route to the midship discharge point. So, we went with a lighter and more flexible hose, and re-routed it back under the cockpit to another through hull next to the new Whale discharge fitting. This gave a longer hose run but a much more accessible one. A downside was that the lighter hose was corrugated while the Shields had been smooth bore so there may be some efficiency loss. If it appears to be a problem we will try to find a smooth bore hose that isn't crazy expensive or wire reinforced, which is difficult to seal onto the hose barbs.Re-routing the Rule-Mate discharge hose closer to the stern meant that we could dispense with the original midship through-hull. As a temporary measure we made up a blanking fitting. Next haul out we will ditch the factory through hull and have the hole glassed in.

Finally, here is an external view of the two new discharge through hulls above the existing factory ones for the port side cockpit drain and the Gusher manual pump.
So, what is the net result of all these changes? Well, if we stay with the 700 GPH output guesstimate for the Whale Gusher manual, improve the output of the relocated Rule-Mate 2000 automatic to an estimated 1500 GPH and add the estimated 260 GPH of the new Whale Gulper automatic we get a very conservative total capacity of almost 2500 GPH, a significant improvement over the original set-up and hopefully enough for all but serious situations.We still have a little water in the bilge but less than 1/2" at the deepest point. That could probably be reduced even further if we put a check valve in the Whale pump pick up but we have previously noted our attitude on check valves.
Addendum 02-10-2017
Shortly after finishing this project we saw an interesting bilge pump emergency back-up feature on another deep bilge boat. In addition to the automatic and manual pumps there was a simple Y valve installed in the engine cooling water intake hose between the sea cock and the raw water strainer. The third port of the Y valve had a length of hose with a small strum box led down into the bilge. With the engine running, the Y valve could be partially or fully operated so that the engine raw water pump could draw some or all of its needs from the bilge. We have no idea of the capacity of the Perkins raw water pump at 2000 rpm but any additional output would be a help in an emergency. We will investigate further. Update 02-12-17 After a bit more research and limited testing we feel there is significant risk that the Perkins raw water pump could not re-prime itself if the prime was lost during the shift from external (raw) to internal (bilge) pick up. So, we've decided not to pursue this option.
Addendum 02-15-2017

As a further weapon to deploy in case of a catastrophic leakage event we are looking at getting a freestanding 'crash' pump that can be deployed anywhere on the boat. There are several reasonably priced products available but the Rule Evacuator 4000 looks like a good investment. With a 15-20 foot fold-flat hose attached it could reach anywhere in the boat and would stow easily in the corner of a locker. It also has the potential to be independently powered from our Yamaha 2000 generator. When we have made a final decision and purchase we will post a report on deployment and performance.
...thank you. Very informative as usual. Cheers.
ReplyDeleteGlad you found it useful Steve.
Delete