The Old Matelot


matelot;
noun,
sailor; from the French mat-el-oh (plural matelots)
A slang expression, chiefly in Britain, may also mean mate or companion.

Welcome to the Old Matelots' blog, my first (and probably last!) journalistic endeavour. Watch its development and evolution as I make the transition into retirement and the live-aboard, off the grid lifestyle on the sailing yacht, Circe. Follow my fortunes (and misfortunes) in the posts as I work to rehabilitate my home on the water.

UPDATE - Due major back-to-back relationship and health issues during 2017 & 2018 I was involuntarily beached and forced to let Circe go. The blog will remain up for the foreseeable future for informational benefit to other owners of these magnificent boats.


*******************************************************************************************************************************************************************


Showing posts with label Propane System. Show all posts

2013-09-09

Propane Tank

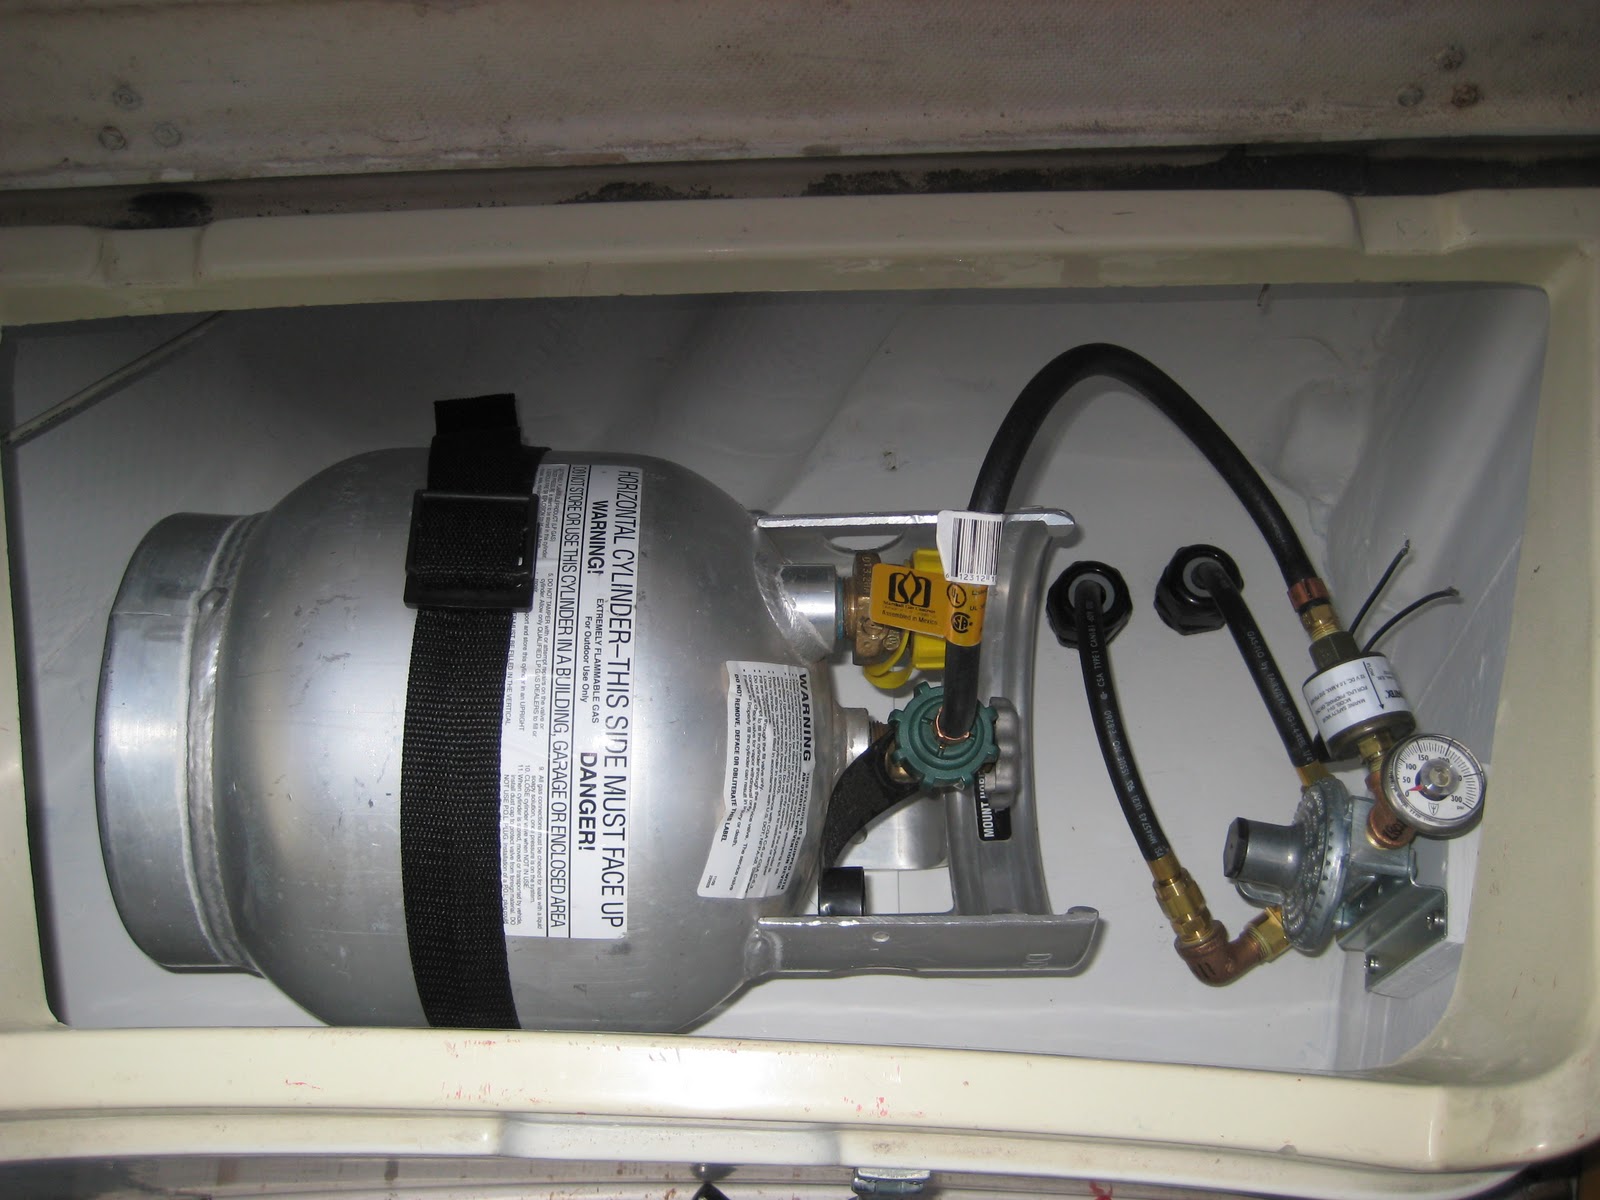
In a 2011 Post describing the Propane System upgrade, we gave all our reasons for choosing the small (10 LB) capacity tank. We have never regretted that decision. True, the Worthington horizontal aluminium tank was a bit expensive but it is feather light when empty and very easily handled and carried when full, a big consideration for Old Matelot backs! It drops right into the unmodified original propane locker and routinely gives us 2 - 3 months of full time liveaboard use....longer in summer, shorter in winter due to the propane heater. 

Having said all that, we also realised that having some reserve propane capacity would be smart as we aren't always able to immediately refill an empty tank. So, we went ahead and purchased a second tank.......and were immediately faced with the challenge of where to store it. While we were at the slip it could sit on the cockpit floor, and it did for many months, but under way we needed something more secure than a short piece of line restraining it (sort of)! It needed a permanent home.


New Worthington tank sitting on cockpit floor.


While looking for a permanent home for the spare tank we considered several different locations. There are off-the shelf brackets that would have made it easy to mount the tank somewhere on the stern rail, but that meant muscling the tank up and over the rail, our backs creaked at the prospect. It could have been secured on the cabin top somewhere but that wouldn't have been very convenient. Then we suddenly realised that we had been living with the tank in the corner of the cockpit for months, without a real problem, so why not secure it there? We had experienced no difficulty using the starboard sheet winch or the stern seat and being right next to the propane locker, the tank couldn't be more conveniently situated. Decision made, all we needed was a suitable bracket.


We've had good luck with King Starboard for similar projects so we sketched up a simple bracket using 1/2" and 3/4" thick pieces.


A quick trip to TAP Plastics with a cut list and $19 later we had all our parts.  


Here we are positioning the parts for the base foot. We used #8 and #10 pan head screws, recessed for looks, to fix everything together. 


Here we've fitted the top hook bar and are checking clearances with the tank. 


The finished base assembly. As can be seen, we had to relieve the top hook bar as it was interfering slightly with the tank body. It didn't need as much relief as we cut, but 2" radius was the smallest we could swing the router.


Here we are positioning the bracket on the cockpit wall. The two pad eyes are for the 2" securing strap.


The finished bracket, a bit closer to the shore power plug than we would have liked, but it all works.  


We were a little puzzled by this decal on the tank. It must be filled vertically, used horizontally and stored 'upright'..........Go figure! 


2011-03-12

Propane Sniffer

When we found our Xintex propane sniffer had failed we spent a little time educating ourselves and looking at the cost and features of replacement devices. From the manufacturer's tag on our failed sniffer we saw it was over 20 years old so we couldn't complain too much about it's performance. We knew Xintex was still in business, although they are now amalgamated with Fireboy, and we also knew that they and Trident seem to have pretty well locked up the fume monitoring market for recreational boating. We wanted to have a system that would both monitor and control the propane system, not just monitor it, and we wanted two sensors......one each for the Hillerange Stove and the Force 10 Heater. Based on those specifications, the durability of the failed unit and the pricing offered by Defender Marine, we decided to stay with Xintex and bought a new S-2A unit with an extra MS-2 sensor.


  Xintex- Fireboy S-2A Controller/Monitor        


One of the two MS-2 Sensors. This one will go under the stove


The controller installation was fairly easy as the new S-2A has the same footprint as the defunct unit but, as always, routing the sensor cables neatly and cleanly through the boat was the biggest challenge. We were able to use the cable from the old sensor under the stove to pull the new one through to the main DC Panel and that went fairly smoothly but there hadn't been any sensor near the heater so we had to route and pull the new one through from scratch.


Extra MS-2 sensor for Force 10 propane heater. 


Once again, as we got deeper into Circe's nooks and crannies, we began to see more evidence of sloppy workmanship at Islander during manufacture. In this case we had chosen to pull the heater propane sensor cable along the same route as the AC cables for the forward outlets and the DC wires for the Salon and forward lights. This route generally follows the hull-to-deck joint along the starboard side and where wires pass the aft chain-plate anchor knee we found the disaster shown in the photo below!


AC and DC wiring and the inverter remote control cable (flat grey ribbon) were all jammed together through a jagged hole with no protection of any sort! A really crappy job. We put some temporary cushioning in place and will have to go back later and do something more permanent.


Another little gem that we discovered while we were under Circe's skirts pulling wires was this. Not the best photo but at some point, either at manufacture or later, a regular steel nut and washer had been used on the  breather through-hull for the starboard water tank. Not surprisingly they were badly corroded. Hopefully we will be able to get them loose without tearing anything up.....just another little detail we need to fix!


While we had the microwave, the GPS and radio out to ease the feeding of the stove sensor cable through to the main DC panel we tidied up all the wiring over the nav. station. That all went fairly well except we destroyed another corroded headliner zipper .......but what's one more bad zipper when most of the others are already shot! They will all go away when we fit Bomar windows in the salon. At that time we will fit rigid ceiling panels and proper insulation instead of the absorbent batting, foam and the 'naugahyde nightmare' used by Islander!  


When we finally got everything pulled through to the main DC panel and started to hook things up we found another litany of wiring problems that needed to be cleaned up. 


Here is a 3-way connector floating loose with two legs cut off and one negative (we guess?) wire disappearing back into the main wiring loom, leading to who knows where! 


These wrong size and badly crimped ring terminals were on the push-pull control switch for the autopilot. Another classy job but, this time, something we can't blame on Islander! All part of the previous owner(s) legacy.


Its a good thing that the starboard lazerette is so big......plenty of room to work.......no pretzel antics this time and no divots out of the scalp!


Finally everything was correctly and tidily connected, the loose wires were cleaned up and we were ready for a 'smoke test'. Everything worked as advertised.


We got the right coloured lights in the right places at the right time at startup and we got alarms when we gave the sensors a shot from the little butane lighter we use for the stove. The integral audible alarm isn't very loud so we will probably install something with a few more decibels.


Finally the last step in our propane rehab project was complete. We now have a fully functioning sensor/controller and propane management system. Off we go to the next project!

UPDATE 2013-6-12
A few weeks ago we started to get random alarms from the S-2A controller....sometimes when no propane was in use? We spent a lot of time checking and re-making wiring connections, testing sensor and solenoid connections and we even changed the sensors, but the problem persisted. Because of the durability of its predecessor we were initially reluctant to finger the controller itself but, with all the peripherals checking out satisfactory, we had no choice but to accept reality. What to do?

After the failure of such a relatively new unit, after only two and a half years, our first thought was to try a competitive (Trident) system, but going that route would have required a complete new installation. With all the other projects we were working on we had more than enough things to do so we finally decided a direct replacement would be the quickest and easiest way to go. With our fingers firmly crossed we ordered another S-2A with new sensors. Silly us!

When the new controller arrived all hopes of a plug and play solution quickly evaporated. Despite  the controller and sensors all having the same part numbers and descriptions, and a similar price, to the old ones, the new S-2A unit was very different!


Old and new, out of the box, looking at the front. So far so good.


Mounting bezel removed, still basically the same, but, where's the ribbon cable?


View from the back.....OMG.... The entire layout, the case shape, the power and sensor connections were all totally different! It wouldn't fit in the existing panel aperture and none of the wiring matched.


It was too late to go back so we had to try and make things work. To avoid major surgery on the bulkhead we had to transpose the S-2A and the remote control for the recently installed Sterling inverter/charger and make a complete new panel to accommodate both of them.


Finally everything was re-installed and the new propane sensors connected. The S-2A seems to be working OK but we remain concerned over its durability. Time will tell!


2011-02-08

Propane System

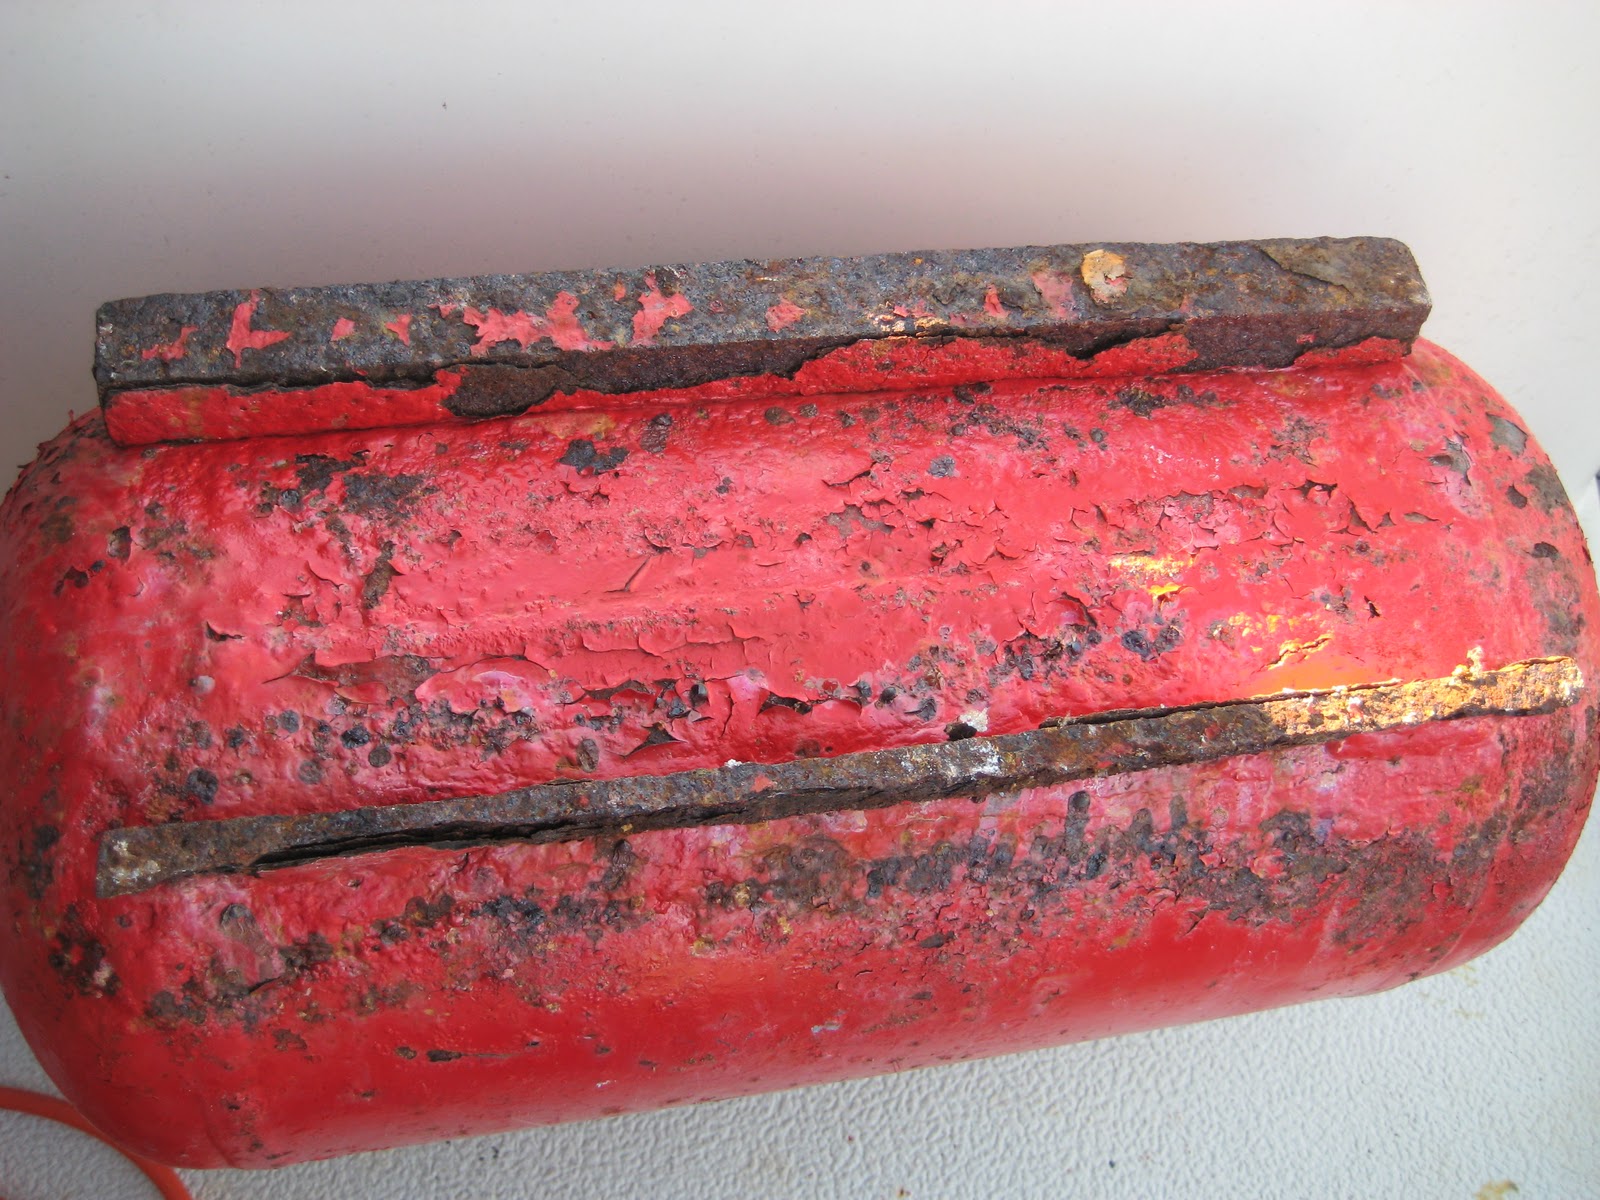
One project that had originally been at the top of our 'must do' list, but kept slipping off the top for a variety of reasons, was upgrading the propane system. From our first inspection of the boat we knew that the propane locker needed cleaning up as it had been used for overflow storage, which is never a good idea, and we also saw  that the tank was an antique.....probably original and likely a good candidate for inclusion in the exhibits at the Smithsonian! 


Despite the fact that the old horizontal tank was out of certification by years, if not decades, somehow the PO had managed to keep getting it filled. In fact it was full when we took delivery, which was one reason we left it alone for so long. Finally though we emptied it and had to address the problem.

In addition to the obvious age of the tank we now discovered that the supply hose was cracked, the hole where the supply hose exited the locker wasn't properly sealed and the solenoid wiring was a mess! As an added bonus, when we tested it, we found the Xintex sniffer in the cabin was bad and the final icing on the cake was finding the supply hose for the cabin heater had been teed off the stove manifold rather than being run separately from the locker....a big no-no per ABYC codes. Apart from all that, everything was fine!!!

It was at this point we realised we couldn't salvage anything and we would have to replace the whole system. We briefly considered a complete system redesign for more propane capacity by using a couple of vertical 20 lb tanks versus staying with the smaller horizontal tank but finally decided that the amount of effort to neatly install big vertical tanks wasn't worthwhile for us. To do it properly would require a lot of surgery to the propane locker, or a new locker and/or cut down cylinders and/or a loss of storage space and/or hanging things off the stern pulpit. None of that appealed to us so, as our plans don't call for extended offshore trips, we finally decided to keep the horizontal tank set-up but to use all new hoses and components. An added bonus of staying with the smaller tank is the lighter weight and ease of carrying.


The first order of business was to yank everything out of the locker. When we pulled the tank out for the first time and looked at the bottom of it we got another nasty shock.


Here is the underside of the tank! The feet were almost completely corroded off and the bottom of the tank body wasn't much better. Severe rust and pitting all over. 


Here is a shot of the supply hose showing the cracks due to repeated flexing as the tank was disconnected and re-connected over the years. Also visible is the marginal wiring for the solenoid and the take-off for the BBQ. A Bush League set-up all around.


Here is another shot of the cracks in the hose. They were normally hidden on the underside so until we disconnected it we hadn't realised things were quite this bad.


The tank hold-down arrangement was also pretty cheesy, a short length of genoa track and a couple of Rube Goldberg screw clamps! This shot also shows the supply hose going through the floor of the locker with a couple of blobs of silicone around it. No way was it vapour-tight. There was no sign of there ever being a bulkhead fitting for the supply hose from the factory!


A mix of corrosion, bolts way too long, threads dinged up and loaded with paint & sealant plus very difficult access under the back edge of the cockpit made for a fun couple of hours getting the genoa track out. The hole drilled for one of the genoa track bolts (centre) had penetrated the transom stiffening!


With the repeated trips under the cockpit floor during this step, precious Old Matelot blood was shed....mostly from the scalp... while removing all these nuts and washers and numerous muscle cramps were also enjoyed as legs and arms were twisted into pretzels! There will be no through holes in new hold-down design! 

Here we are getting ready to pry the last bolt out of the genoa track. Even with the nuts and washers off, getting the genoa track and clamps out of the locker was a real battle. There was no room under the locker to swing a hammer so each bolt had to be unscrewed, wiggled and pried until it was out far enough to grab with the vice grips.   


The paint in the bottom of the locker was rust stained,  all torn up from the storage and cracked with age. So, out came the knee pads, trusty heat gun and scrapers and we spent a delightful afternoon cleaning up the locker. 


Here is the locker cleaned up and with some of the holes sealed with wooden plugs and epoxy. After we finished plugging the remaining holes we left the epoxy to cure overnight.


After some sanding to knock down the worst of the  remaining rough spots we hit the whole locker with several coats of alkyd enamel primer and topcoat. Looks a little bit better now.


We designed a simplified hold-down  for the new 10 lb Worthington aluminium tank. A piece of 3/4 inch King Starboard as a base, some 3/8 inch stainless pins to locate the tank and a 2 inch wide battery strap. It was quick and easy to make, inexpensive and corrosion proof. With no through-bolts, it will be easy to remove without going under the cockpit.


It took a bit of trial and error to find the best position for the hold-down assembly so that we had plenty of clearance for the regulator and supply hoses and still enough room for a hand to go between the tank and the edge of the locker to lift the tank out. After seeing what happened to the old supply hose with the regulator, solenoid and gauge all hanging off the tank, and knowing there would now be two supply hoses, we wanted to limit the chance for hose damage so we got a bulkhead-mounted regulator. 


Just visible (lower right) is the mounting pad for the new regulator epoxied onto the side locker wall. The tank pigtail will now be the only hose being  moved around for tank changes.


Here is the new bulkhead mount regulator and fittings going in for a trial fit to find the best position for the supply hoses. With the exception of the Trident 300 psi gauge that came from Defender, we bought all the other hoses, gas control parts and fittings from RV and other non-marine sources and saved at least 50% over WM and local chandlery prices! RVA in Denver was a particularly good source.


After a lot of research on pipe thread sealants and ptfe tapes we settled on Rectorseal #5 from our friendly local True Value store. 


This stuff isn't the easiest to work with but its the gold standard for pipe dope.


After the trial fit of the regulator, and with all the clearances identified, we were able to put in two new exit holes for the stove and heater supply hoses. 


The vapour-tight bulkhead fittings we found for the supply hoses were designed for bulkheads up to a half inch thick. Our propane locker floor varied in thickness from three quarter inch to one and an eighth inch. We solved the problem by having a adapters made but at installation we found they weren't quite right. A big thank you to Shawn and Carlos at Bay Marine in Richmond for opening up their machine shop at short notice to modify them.


More fun filled time was spent, again, twisting Old Matelot bodies into pretzel shapes under the cockpit floor to get everything sealed and installed but the spacers worked perfectly.


Here is a shot of the first trial fitting of all the various pieces. There will be vapour tight bulkhead fittings on both supply hoses.


Here is where the original supply hose was mounted, held up with a bunch of cheesy zip ties. Not too impressive. Maybe another of Islander's cost cutting moves? Also evident is the fact that the underside of the cockpit floor was painted after the hose was mounted, another sign of how things were done at the factory. 


We chose Ancor stainless, cushioned hose clamps. A lot more effective and secure than zip ties, not to mention a lot more professional  looking.


To make our lives complete, while we were under the cockpit we also saw signs that the rudder stop beam may have been moving slightly, visible above at bottom right of the photo.  We also saw that the e-tiller access cover had been leaking, causing corrosion of the steering quadrant. Just what we needed, more projects for our list!!!!


Here is the whole new system in place, ready to wire the solenoid and pull the new supply hoses through into the cabin. Check back with the first photo in this post for the 'then & now' comparison.


Here is the area behind the stove showing the old stove supply hose (left) and the heater supply hose (bottom) that had been incorrectly teed together off the stove manifold. ABYC codes require a separate supply hose from the tank locker to each appliance on the boat, with no joints inside the cabin. 


Here is the new stove supply hose pulled through to the galley. After the bulkhead grommet is installed it will be  ready to connect.


Here is the hose grommet in place ready to put the stove back.


We taped the new heater supply hose to the end of the old one and pulled it through to the heater....quite a chore in itself.....and hooked it all up. We temporarily wired the solenoid directly to a breaker for testing and everything worked fine. A tough project but we now have a lot more peace of mind regarding a critical system! Next up will be the sniffer replacement. Stay tuned!