The Old Matelot


matelot;
noun,
sailor; from the French mat-el-oh (plural matelots)
A slang expression, chiefly in Britain, may also mean mate or companion.

Welcome to the Old Matelots' blog, my first (and probably last!) journalistic endeavour. Watch its development and evolution as I make the transition into retirement and the live-aboard, off the grid lifestyle on the sailing yacht, Circe. Follow my fortunes (and misfortunes) in the posts as I work to rehabilitate my home on the water.

UPDATE - Due major back-to-back relationship and health issues during 2017 & 2018 I was involuntarily beached and forced to let Circe go. The blog will remain up for the foreseeable future for informational benefit to other owners of these magnificent boats.


*******************************************************************************************************************************************************************


2011-08-27

Battery Vent Caps

In an earlier post we showed how we cleaned up all the primary wiring to the two 6 volt L-16 batteries and put them in a secure enclosure built from starboard. That upgrade was a major improvement, but we still had some problems keeping the tops of the batteries dry.

We considered replacing the lead-acid batteries with AGM's but the Trojans were in really good shape and holding charge well. Also, we keep reading that lead-acid batteries are best suited to our situation, where the DC system is run with dock power plugged in for the majority of the time. 


Difficult to see in this shot but there is 'weeping' or 'sweating' on the caps of a couple of cells on the forward battery.


We fussed with the acid levels for several months but never found an ideal condition. If we kept the acid just barely above the lead plates it eased the problem considerably but we had to watch the levels very closely and top the cells up frequently to avoid exposing the plates. If we were more generous with the distilled water and let the level come up, even a quarter inch above the plates, the sweating started. It got worse with a heavy equalising charge and/or a bumpy ride, such as motoring into steep chop. 

Things came to a head when we found that despite our efforts to keep them dry, the moisture on top of the batteries had been enough to rot the hold-down straps and corrode the strap anchors. The acid had slowly wicked along the straps and corroded the buckles and anchors. The stitching on one webbing strap actually disintegrated.


Corroded buckle on one of the hold down straps.


Corroded anchor bracket for hold down strap.


Corroded buckle on second hold down strap.


A poor photo but it shows the stitching on the strap above that actually fell apart due to the acid!


We had to do something. While surfing the net for solutions we found several products that promised to fix our problem, which evidently is quite a common one with lead-acid batteries. After a bit of research we decided to try the Water Miser made by Flow Systems.


The Water Miser vent caps are designed specifically to eliminate misting from escaping gas during charging cycles and are a direct swap with the standard 1/4 turn caps on most wet cell batteries. They are also very inexpensive.


We sent of for a half dozen caps figuring we couldn't get hurt too badly. Here they are, installed, about two weeks ago. We topped up all the cells to a level that previously would have guaranteed some weeping and, at the time of publishing this post, we have seen no sign of any problem.....Yippee!  


The old caps on their way to the dumpster, another item crossed off 'The List'! 


2011-08-23

Horror Gallery

In one of our early posts we noted that when we got Circe we felt she was suffering from 'benign neglect'. While working through our various rehabilitation projects we have revised our opinion somewhat, as we have discovered numerous 'horrors' in all areas of the boat. Some were the result of crappy work done by the PO's but some were clearly done at the factory during the original assembly and more than once, half seriously, we have joked about re-naming her 'Lemon' or 'Monday Morning'. Either way, we thought it might be fun to record them here in their own post. The photos are in no particular order or priority and we will add to them from time to time, as and when new 'delights' are discovered or misfortune befalls us.


From our first inspection of the boat we knew about this problem with the primary battery wiring. We used it to our advantage during the sales negotiation but, as it truly was a horror, we thought it deserved a spot in this post.


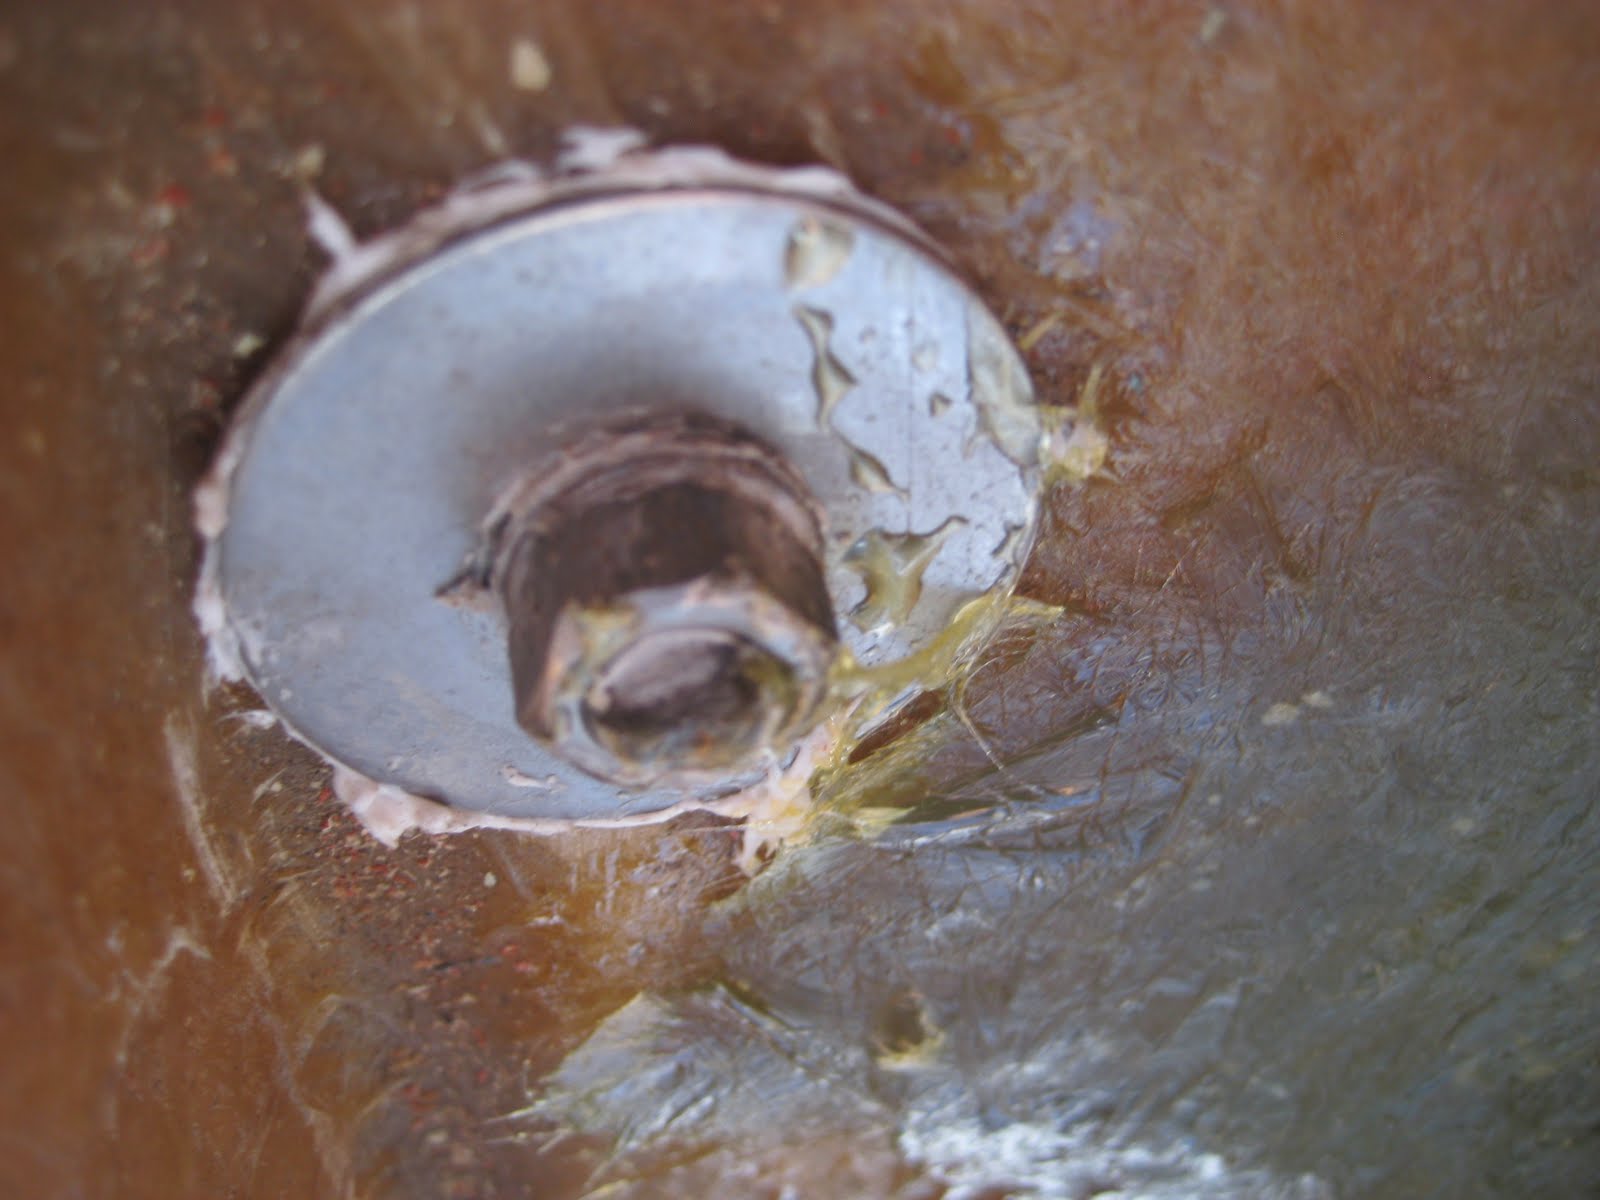
Chainplate bolt too long. Acorn nut bottoms out before tightening down on washers. This problem wasn't visible until the 'naugahyde nightmare' was pulled out.


Salon window aperture cut freehand (very badly) with jigsaw at the factory. Several of the windows had similar problems.


Massive amounts of caulk on salon window to compensate for window aperture cut way oversize. 


Wrong size washers used on chainplate bolts. 8 bolts were this way.


3 way connectors used to tap power from lighting circuit for a radio. Hot and return connectors lying side by side with no insulation.


Chainplate bolts shortened with hacksaw and end left raw. 8 bolts were this way.


No comment necessary!


The hacksaw strikes again. Genoa track securing bolt cut off too short and end left raw.


Propane supply hose going through propane locker floor without the proper vapor-tight bulkhead  fitting. Raw hole with virtually no sealant.


AC and DC wiring jammed through raw hole behind chainplate 'knee'.


AC and DC wiring chafing on raw fiberglass hole at  bulkhead.


3 way connector left hanging at DC panel.


Regular steel nut and washer used on water tank breather fitting.......badly corroded. From the splotches of paint its clear this was done at the factory!


Ring terminals on Autohelm circuit breaker connections wrong size and badly crimped.


Hole in the pick-up hose for the manual bilge pump. The pump worked, but only just! An oversize screw in a cable clamp was the culprit.


A couple of gallons of adhesive used to glue a small piece of foam insulation to the underside of each engine room hatch. Looks like it was done by a drunk on an acid trip.......well, it was 1982!


We wondered why the propane locker lid was so stiff. Here is the answer...... one of two hinges installed incorrectly, out of alignment, causing binding and stress cracks in the gelcoat.


The next four shots show some more items overlooked in Islander's QA department. In this first one the mounting holes for one of the starboard bow pulpit leg bases were drilled incorrectly. Nothing that a good dollop of caulk can't hide!!!!


Two horrors hiding under the cap rail varnish. At left is a retaining screw drilled too close to the edge of the scarf joint so it split the cap rail. At right is a cross screw through the scarf joint that was incorrectly angled and has broken out on top of the cap rail after the rail was sanded. Close up shots below.


In addition to putting the screw too close to the joint the plug was a bad fit and had been filled up with some sort of goop.


When it broke out, instead of replacing the screw with a shorter one and filling the divot with wood putty, the screw tip had been filed flat and covered with a blob of brown paint prior to varnishing.
A funny thing happened one morning at the dock. Right in the middle of breakfast we lost shore power and the inverter kicked in. The AC main breaker on the boat didn't trip but the 'reverse polarity' light came on. A quick check of the breaker on the dock showed that the problem was in the shore power cord. Ooops!


Isn't it about time we replaced the prop zinc? When was it last done? I'm not sure, lets check...........Oops!


Instead of correctly aligning the swim step with the transom, the factory glued a 1/16" teak shim under this barrel bolt so that it would engage with the misaligned swim step.....Duh!


This #10 wire linked the AC main breaker and the water heater supply breaker. It was the correct length, the ring terminals were the right size and they were correctly crimped but........one terminal screw wasn't tight. It was snug, but not tight. Evidently it had eased off  due to the thermal cycling that is common in the AC circuits. Check terminals regularly!


A combination of over tightening and galvanic corrosion had destroyed the slots in the base flange of the compass mount.


This problem was rectified many moons ago when we replaced the windows but we only recently found this pic in an old file. Reminded us of the 'creative' wiring techniques employed by the PO, this time adding a light over the galley sink. The wires were routed under the window trim and then poked through the vinyl..........What can you say?


2011-08-06

Circuit of the Central Bay

While we have been working on all our upgrade projects we have been unable to sail Circe very much so we have been going out every few weeks on our sailing club boats for a 'fix'.


This last trip we took a camera along for a few photos.  We were on a Catalina 42, along with six other club members, for an afternoon romp on The Bay. This particular C42 has in-mast furling for the Main as well as roller furling for the Genoa so it is really easy to tweak the sail plan from the cockpit. The in-mast furling is a nice feature, although we would never want it on Circe as we are terrified of a jam! We have seen it happen a couple of times. Its no fun to have the Main fully deployed and no way to furl or reef it when the wind suddenly  pipes up the way it does when reaching from Angel Island, across The Slot towards the City front! Despite our paranoia, it really is a cool feature, and nice to use too.........as long as it works!

On this sail we made a counterclockwise tour of the Central Bay. We started on a beam reach out from Potrero Channel, headed west towards Tiburon, before turning SW into Raccoon Straight. An upwind slog past Angel Island into the Central Bay. A boistrous beam reach South across The Slot, in front of the Golden Gate Bridge, before falling off to the East along the City waterfront. We had some nice views of the City, Coit Tower, the TransAmerica Pyramid, Ghiradelli Square, Pier 39 and the Maritime Museum before we jibed downwind to port for a leisurely run back to Richmond. A trip of about four and a half hours with a good variety of wind conditions, from 12 to 25 knots. Life is good!


Josh (left) and Brian, visiting from the E. Coast. Ed at the helm.


Old Matelot minding the port sheet winch, waiting impatiently for some helm time. Michelle on the right.


Helen at the wheel.


Nicely trimmed ketch screaming past. Who needs a mizzen with 25 kts on the starboard beam!


Ed kicking back in a very patriotic pose.


The Big House on Alcatraz.


Sally trying to plow a straight furrow.


No matter how often we pass it, the 'Gate' is always a spectacular sight.


And it always makes a perfect backdrop for almost any photo.


The Chevron dock was a very busy spot this day!


Sailboat? What sail boat? Where?


The Admiral taking us through Raccoon Strait!


Yeah.......Finally.
Now, let me show you how it should be done!


The Balclutha, square rigger at the SF Maritime museum.


City-scape with the marine layer hanging over the Trans America pyramid (centre) and Coit Tower (left).


Relaxing downwind run back home, along Potrero Channel behind a container ship.