The Old Matelot


matelot;
noun,
sailor; from the French mat-el-oh (plural matelots)
A slang expression, chiefly in Britain, may also mean mate or companion.

Welcome to the Old Matelots' blog, my first (and probably last!) journalistic endeavour. Watch its development and evolution as I make the transition into retirement and the live-aboard, off the grid lifestyle on the sailing yacht, Circe. Follow my fortunes (and misfortunes) in the posts as I work to rehabilitate my home on the water.

UPDATE - Due major back-to-back relationship and health issues during 2017 & 2018 I was involuntarily beached and forced to let Circe go. The blog will remain up for the foreseeable future for informational benefit to other owners of these magnificent boats.


*******************************************************************************************************************************************************************


Showing posts with label Woodwork Re-finishing. Show all posts

2015-07-24

Galley Cabinetry


With the new sink, countertops and Force 10 range we recently installed, the rest of the galley cabinetry was looking really shabby. The sliding doors on the flatware locker, the louvered locker doors, the drawer facings and veneered surfaces on either side of the range were in bad shape and needing some varnish. Time to spruce things up a bit.


The new 3 burner Force 10 stove we installed back in January (no blog post) was approx 2 inches deeper, front to rear, than the old Hillerange unit it replaced. Although it fitted the original gimbal locations it intruded into the slide away feature for the countertop filler. We would have to come up with a solution to that problem during this project.  


Here is the old range. The stove top burners worked OK but the oven temperature control was a bit vague and there was no broiler. The Admiral decreed it had to go. 


Here we've started pulling things apart. Getting the sliding doors out from the flatware lockers was a challenge. Either by accident or design they wouldn't lift out the way sliders normally do. We had to remove the lower track and even then it was a fiddly job.


We knew from our experience refinishing the cabinetry in the head that prepping the louvered doors would be the biggest challenge. We had used Cetol in the head but the prep work was the same, sanding all those little louver slats is very time consuming and a real pain but......


......once again we were fortunate that one crew member had the necessary patience!


Doesn't she do good work.


Here are the sliders, before and after. Top one cleaned and sanded ready for varnish. 


Here is another before and after shot of a couple of drawer facings.


We decided to use Bristol Finish two part varnish for all the trim as we had good luck with it when we refinished the cockpit table several years back. It is a two part fast build product and is extremely hard, ideal for high wear areas like the galley.


Here are the louver doors starting to look a bit better after the first two coats of Bristol. We put four coats wet-on-wet and then waited a couple of days and sanded them lightly prior to the fifth and final coat. 


Same routine for the sliders and.........


.....also the drawers.


At this point we had to decide what to do with all the veneered surfaces. The lower edges of the area around the flatware locker had bad delamination damage due to water spillage on the countertop running down and laying against it. We stripped it off and began preparing for fresh veneer....then we had a brainwave


After we installed the Bomon windows in the main cabin and started trimming the bulkhead and walls we decided to paint over the shabby veneered bulkhead to brighten things up. That was three years ago and the painted surfaces have held up well. The exterior vinyl paint we used is very durable, any nicks and dings are easily touched up and any marks wipe away with a damp cloth. Why not do the same for the cabinet facings in the galley?


Purists will probably cringe at our decision but, for us, the resulting brighter and more modern looking cabin was well worth the small sacrifice in originality. Here we have sanded and applied a blocking primer to the areas above the counter.


Here we've got some colour on and started to re-install the sliders on the flatware locker.


Here we've finished painting the facing panels on the fridge/freezer side and replaced the drawers.


Ditto the facing panels below the sinks, and the louver doors have been re-fitted.


The depth of the full size stove created an interference between the outboard louver door under the sinks and the handle on the oven door. To restore full opening of the door we  cut it down  by approx 4" and made the top section a fixed/removable piece.


This shot shows the shortened door opening below the oven door handle and the upper part still in place above.


This shot shows how the the upper section of the door is mounted with snap latches. It pops right off if necessary for full working access under the sinks. 


In this one we have started fitting new trim molding around the edges of all the counters. Notice the 'clean off notch' we cut into the molding over the drawers. Just visible on the sink side is the 'clean off corner' of the counter where there is no trim.


Here is a close up of the notch. It will make wiping the counter a bit easier on that side. 


On the home stretch here. Pretty much everything finished and starting to look a bit more like a galley again. Next we need to do something about the counter filler over the range.


Update 08-10-15


After throwing around some ideas on what a new counter filler might look like we quickly realised its size would be controlled by where it could be stored when not needed. With the bigger Force 10 range we had lost the 'slideaway' feature for the old filler so the new one would have to be easily removable, and designed so it could fit alongside or under the range, or elsewhere. Some quick measurements showed us that there was enough room under the range to fit a 22"x 18"x 1" filler. 


Here is a shot showing the available space under the range, a little over two inches.  


We went with half inch ply and edged it with teak channel molding. Here we are making a trial fit. The new filler will be slightly smaller than the original but it will have the advantage of moving with the range on its gimbals and providing a useable surface under way.


Here is the finished filler in place on the cooktop.


To hold the filler in place we cut four notches in the back side edge molding to engage with the two side rails of the cooktop. Here is one pair of notches. 


Here is a close up of one of the notches. They are only about 1/4" deep but seem to keep the filler securely in place......at least so far........we haven't had the cap rail in the water lately!   


This shot from the underside shows how the notches engage the cooktop. 


Here is the filler stowed under the range. It fits in the available space quite snugly but it does restrict the movement of the range at the extreme limit of swing on the gimbals.


So, if we need to use the range while under way then we slip the filler into one of the lockers under the settee.    


2011-11-28

Cap Rail part deux

The last piece of  the cap rail to be re-finished was the short strip on top of the fold-down transom swim step. We had left it until last as we knew we would also need to re-finish the teak swim steps themselves and the transom side trim at the same time so, as soon as the new lifelines were installed, we started in on it. 

We had always known that the swim step wasn't perfectly aligned with the transom and tended to hang up, but we hadn't looked at it closely and thought it was the woodwork binding. We planned to fix it while we were sanding the central piece of cap rail. However, when we carefully examined the step, we saw some things that sent us off in a couple of new directions........maybe this post should have been titled 'Transom rehab'! 

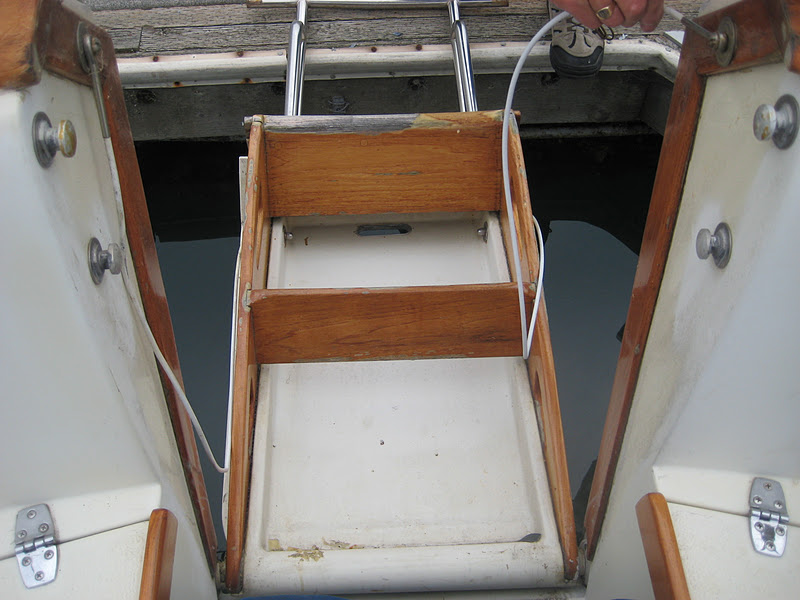
This shot shows the misaligned swim step, almost 1/4", but a close look shows the 'gotcha'....the barrel bolt is perfectly aligned! After a lot of pulling and pushing we forced the step into correct alignment, but only by literally jamming it in place. More disturbing was the fact that we found the cap rail wood had plenty of clearance. 


This shot shows the step correctly aligned, but only after forcing it into place. Now look at the barrel bolt! 


This close-up shows the position of the barrel bolt with the step correctly aligned. Both bolts had the same problem, showing they were obviously assembled with the step out of alignment at the factory. After finding the swim step wouldn't line up properly with the transom the barrel bolts were just installed to suit ....cute huh!


So, if the cap rail wood wasn't causing the problem what was? We used a piece of paper as a feeler gauge and soon discovered that the actual swim step molding was too wide and was jamming against the transom on both sides.

The edges of the step needed to be eased off by around 1/32" on each side. Obviously, removing that much material would destroy the gel coat on the edges of the step.....maybe that's the reason why nothing was ever done to fix the problem? 


Repairing the gelcoat along a narrow strip like the edges of the step molding is probably the easiest gelcoat repair to make, because it is completely hidden most of the time, so it shouldn't have been a big deal to fix it at the factory.......but what do we know! Anyway, it had to be fixed so out came the 'mouse' sander and we tore right in. 


Not surprisingly the factory gelcoat was quickly stripped off by the sanding but after a few minutes work the step now closed smoothly into perfect alignment with the transom.


Of course, the barrel bolts were now misaligned, so they had to be removed and repositioned. Here we are pulling them off and....Lo and Behold...... under the one on the starboard side we discovered another factory 'adjustment'. A 1/16" shim had been glued to the transom so the bolt would line up with the misaligned swim step!!!!


Here we are trying to get the shim off the starboard side of the transom without damaging the gelcoat. For some reason there was no shim under the port side barrel bolt?


When we got the two barrel bolts off we found that the plastic anti-rattle blocks were broken on both of them. After 30 years we really can't complain about them failing. None of the distributors we contacted carried just the anti-rattle block so we ordered some replacements directly from Perko Marine.


While we were waiting for the anti-rattle blocks we stripped and oiled the teak trim on the inside faces of the transom.


In a very unusual development Perko Marine shipped the replacement anti-rattle blocks free, gratis and for nothing.......excellent customer service. New block shown at top and old broken one at the bottom.


Here is one of the new anti-rattle blocks in place under a barrel bolt.

Because the base of the barrel bolts aren't wide enough to completely cover the old mounting holes we will fill them and maybe use a thin cosmetic stainless shim to make things look presentable.


Here is the repaired and repositioned swim step and barrel bolt on the starboard side........


......and the port side. Everything nicely aligned and looking good. And now for the the next piece of bad news, because we had re-aligned the swim step to the transom .....


........we had created a big mismatch in the stern rails. Originally installed to match the misaligned swim step, the error at the rail was now magnified due to the greater distance from the swim step pivot. The 1/4" error between the edge of the swim step and the transom had grown to more than 1" up here at the top rail!


We were too embarrassed to post a pic showing how we used a come-along and a webbing strap to 'encourage' the stern rail halves back into alignment with the swim step, but that's what we did..... and here is everything back together.


Over time, the retaining sleeves on the stern rails had become deformed and were very loose, so we used  large hose clamps to squeeze the sleeves back to the correct shape. General wear and tear had also resulted in the 5/16" holes for the sleeve locking pins becoming misshaped and enlarged. We re-drilled the holes to 3/8" for bigger pins.


We weren't too keen on the existing 5/16" 'ball-lock' pins (left) because they are hollow, for the push button feature to work, and they tend to freeze up and/or bend. When we upped the hole size we went with 'fast-pins'  (right) which are a solid shank design that is much stronger and has no internal mechanism to cause problems.


She's starting to look a bit like a boat again!


Now....finally...... we were ready to start refinishing the last piece of teak cap rail and swim steps! While we were at it we also replaced the two swim step tether cables.


We used 1000 grit paper and wet sanded the inside gelcoat on the swim-step molding then finished up with polishing compound and wax. There were a couple of small 'divots' in the gelcoat but nothing too terrible......it's an old boat!


All the swim-step woodwork was stripped, cleaned, sanded and oiled  using the same method detailed in the earlier cap-rail post. This shot, taken after the top rail had been removed, shows how much cap rail wood had been sanded away over the years! Evidently the top rail over the swim step had never been removed before!


It was a real pain stripping the old varnish and sanding, because of all the weird corners, angles and cut-outs on the steps, but we persevered and it turned out looking pretty good, everything considered.


What is really nice is that deploying the swim step is now a one person, one hand job rather than two people, four hands and lots of cussing! On to the next project.