We have been pretty lucky with deck and cabin leaks on Circe. Since we installed the Bomon Windows back in 2012 there haven't been any.........until some recent heavy rain when we noticed a couple of small weeps from the Bomar hatches in the Head and the Pullman Berth. We fussed with the hatch seals and the locking dogs to try and stop the leaks but on closer examination we saw that water was actually getting between the hatch frames and the deck. It was time to rebed the hatches. Because the finish on all the hatch frames looked really shabby and a couple of the lenses were showing signs of serious UV damage we briefly considered new hatches but, after checking prices, design & quality of contemporary offerings, sanity prevailed and we decided to completely strip and refurbish our four existing hatches.

Here is our beta site candidate, the deck hatch over the Head. Despite having a Sunbrella cover in place most of the time there was still bad crazing in the lens. The hatch lid and frame are rugged Almag 35 gravity die castings but after 34 years the general finish was very rough. There are two of these 20" x 20" hatches, one in the head, one in the Pullman and two smaller ones 14" x 18" in the main cabin.
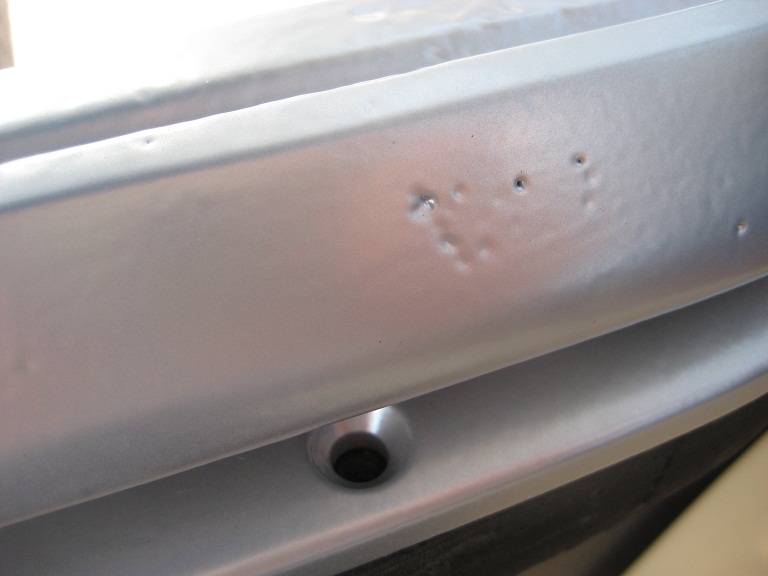
We knew from past experience that mixing stainless steel and aluminium always results in galvanic corrosion problems and a battle to remove fasteners, so the first step was to dose the hinge pins, locking dogs and the prop arm bolts, all of which are stainless, with PB Blaster (PBB) and Kroil for a few days.

In anticipation of each hatch being off the boat for a week or more, and while we were waiting for the PBB to do its thing, we built temporary covers from 1/2" ply edged with 1" x 1/2" neoprene weatherstripping and a couple of 1 1/2" square cleats to hold it down. We soaked the covers in penetrating epoxy in case we had any rain. Here is a shot of the large cover for the hatches in the Head and the Pullman.

We decided to remove the hatch in two pieces, first the lid then the frame. We started by trying to disconnect the two prop arms. Despite the lengthy soaking in PBB the bolts holding the top of the arms to the hatch lid were very difficult to remove. Fortunately the bolt holes were tapped right through the mounting ears on the hatch lid so we could squirt PBB into the threads from both sides, but it still took a couple of hours of gently working the bolts and repeated doses of PBB to get them out without trashing the threads. When they finally surrendered we discovered there was evidence of thread locker on them. Severe galvanic corrosion with a little Loctite thrown in.....Sweet!! The hatch design didn't include any way to positively position the bolts, so a thread locker had been used.

Next up were the hinge pins. We didn't have a proper roll pin punch handy so to drive the pins out we used a regular tapered pin punch and an Allen Head socket screw with the shank ground down. After the PBB/Kroil treatment the stainless 1/4" Spirol hinge pins moved fairly easily, and once they were partially out of the hatch frame the lid came free. The pins were then fully driven out on the bench.

Here is the hatch lid off and ready for stripping the locking dogs and removing the lens.

Here are the pin punches we used and.......

......and here is the 'modified' Allen screw. When driving tension or roll pins It is very important to have a flat ended punch with a diameter as close as possible to the pin diameter or the end of the pin will deform, making removal difficult. Ideally a special roll pin punch with a locating pip on the end is needed to avoid damaging the pins. We'll pick up a couple of proper pin punches in 1/4" and 5/32" sizes before we do the other hatches.

Next we tried to remove the bolts holding the bottom of the prop arms to the hatch frame.....big mistake. From our experience with the top prop arm bolts we knew the bottom ones would be a challenge, particularly as they appeared to be tapped into blind holes, but we persevered with the PBB and repeated torquing on them until.............Oh Sh*t. We sheared off the one on the Port side.

Being of above average intelligence we instantly realised that we needed to ease up and be a bit more careful with the other bolt, so we moderated our torquing efforts, increased the PBB applications plus we tried a hammer action socket driver and were rewarded with.........Oh Sh*t. Well, both the prop arms are off now.

Next we started removing the hatch frame itself. As seen here the frame sits on a molded hard rubber adapter/spacer/gasket that compensates for the curvature of the cabin top and provides a (somewhat) flat surface to mount the hatch. Unlike most other boats we've seen, all Freeport hatches sit on one of these hard rubber doohickeys, so there are two joints to be sealed, hatch frame to the doohickey and doohickey to the deck.

As pictured on this Endeavour, a more common installation of deck hatches uses raised platforms molded integrally with the deck, giving a flat mounting surface and only one joint to seal between the hatch frame and the deck. This design is likely more expensive in deck mold construction and laminate layup time than the Freeport doohickey but the single sealing face makes hatch installation easier with less chance of leaks.

Anyway, we had the doohickey to deal with and here we are starting to separate it from the deck. We used putty knives backed up with wooden shims to break the joint which, in true Freeport fashion, was sealed with gobs of silicone!

Here we have got the frame off and we're trying to clean up the deck. Difficult to see here but this was another big challenge as the hatch was bedded directly on top of the non-skid. We found a cup wire brush in the Dremel was the fastest way to get all the little bits of silicone out of the non-skid.

We persevered and after an hour or so we were finally ready to fit the temporary cover. Once it was in place we gave it a thorough soaking with the hose to make sure we had a good watertight seal.

Here is a side view and.......

.....and here is an inside view. With the cover securely in place we could start stripping the hatch.

The next step was to separate the doohickey from the hatch frame.We took a lot of care so as not to damage the rubber. With the doohickey off we saw that the lower prop arm bolts were tapped right through the frame just like the upper ones were tapped right through the lid, it was just that we couldn't see them while the frame was on the deck.

Lesson learned. If we had taken the frame off before attempting to remove those lower bolts we could have shot some PBB into the back of the threads like we did on the lid and maybe got the bolts out in one piece. Anyhow now we were faced with two Helicoil repairs.

Helicoil, one of the best inventions ever. We picked up a 5/16"-18 kit from the local ACE Hardware store, then we.........

.......we drilled out the two sheared bolts and repaired the threads in both sides of the frame. We wanted stainless helicoils but they were special order so we went with regular steel and we'll make sure the bolts are assembled with plenty of anti-seize to minimise future corrosion issues.

Next step was to remove the old silicone sealant off the hatch and the doohickey. The hatch was cleaned up quickly with a rotary wire brush in the Dremel but........

.....but cleaning the silicone off the doohickey took a lot more time and care to avoid damaging the rubber surfaces.

As we were cleaning the doohickey we were surprised to see the sealing faces of the molding were very rough and.......

.....and how they weren't very flat, explaining the excessive amount of silicone that had been used to seal it.

Next we stripped the lid. This time we had a proper punch and despite significant corrosion, the hinge pins for the locking dogs came out quite easily.

Removing the lens also went quite easily. We used an Exacto knife on top to cut the sealant around the perimeter and then a putty knife from the bottom to separate the lens from the lid.

Here we are scraping the old caulk off before final clean up using the wire brush.

Finally, the hatch lid and frame were ready for refinishing. We were undecided between powder and two part epoxy until we got the pricing! Powder was much cheaper and just as durable although we had some concerns about the quality of finish. We used Richmond Metal Painting for the first hatch to see how it looked. We chose a metallic silver finish to match the anodised alloy frames of the Bomon windows in the main cabin.


Next we turned our attention back to to the deck aperture. The good news was that it had been cut quite neatly and accurately. After the ugly apertures we found when we replaced the Main Cabin Windows we were pleasantly surprised. Not so good was the use of deck screws to secure the hatch and several of them were 'spinners', having been over tightened at some time in the past. We decided to upgrade to through bolts and so we had to break the headliner free to fill and redrill all the old fastener holes.

The frame and lid came back from powder coating and while they looked pretty good they weren't perfect. Some of the flaws from the original gravity die casting process were still evident.
There were no serious corrosion pits on the frame or lid but some of the blemishes from the original gravity die casting process can still be seen here. If we had gone with two part epoxy paint these blemishes could probably have been better filled and blended in. We'll address this on the next hatch.

Next up was sourcing the new lens. We were surprised when we found that TAP, our local 'go to' source for most plastic supplies, didn't carry polycarbonate in the thickness and tint we wanted. We eventually found it at Interstate Plastics in San Leandro.

We did a lot of research on the best sealant to use with the polycarbonate lens and eventually settled on Dow # 795 in Grey. It has the best adhesive characteristics for the Makrolon with good UV resistance plus the colour was an ideal match for the grey lens and silver grey frame.

One of the most fiddly parts of the whole job was trimming the lens cover sheet to suit the lid. First we chopped up a paint stirring stick and made some little spacers, two per side. Then we taped them onto the lens to make sure it sat centrally in the trough cast into the lid.

Next we flipped the lid over, with the lens still in place, and traced around the bottom side to highlight the areas of the cover sheet we needed to trim. We used the Exacto and a delicate hand so as to cut the cover without scoring the lens.

Here is the trimmed cover sheet ready for installation.

Another fiddly step was the masking of the lid. The top was a snap but the bottom was much more of a challenge with all the curves and corners. At last we were ready to install the lens. We wiped the cast trough in the lid with acetone and the exposed surfaces of the lens with denatured alcohol. DON'T get acetone on the polycarbonate.

We applied generous beads of the adhesive all round the lid and crossbars and assembled the lens with light pressure. It's important not to put too much pressure on the lens and squeeze out all the adhesive. We found just the weight of the inverted lid was enough. Here we are using a plastic stirring stick to scrape off all the excess adhesive.

The Dow 795 starts to cure fairly quickly so it is important to remove all the masking as soon as possible. Then we left the lid to cure overnight.

While the lid was curing we turned our attention to the frame. As previously mentioned we filled all the holes from the original deck screws in preparation for using through bolts when replacing the frame. Using the frame as a template we redrilled the holes and dry fitted the hatch and doohickey to install the flange nuts. We used flange nuts to minimise the intrusion under the headliner.

Finally ready to be re-installed. We hate silicone & polysulfide caulk and only use it where absolutely unavoidable, so butyl mastic was our bedding material of choice. We've used it successfully to seal hardware elsewhere on the boat and found it to be very versatile, durable, simple to apply and easy to clean up. Here we are laying butyl around the underside of the hatch frame. We did the same on the underside of the rubber doohickey. We got the black butyl from NFM in Port Townsend.

Then we clamped everything together and screwed it down. Here the excess butyl can be seen oozing out of the the two joints. Also visible is the butyl we used on each of the fasteners. The grey butyl came from Compass Marine.

We also left the frame to settle overnight before final tightening. Then we put a new lid seal on and re-assembled the lid to the frame. We discovered that there are two types of lid seal for Bomar 100 series cast hatches, 1/2" diameter and 9/16" diameter. Both look very similar and both fit, but the small one doesn't provide enough compression for sealing against high pressure washing. The 9/16" is the correct one.....don't ask how we know this.
Also visible in this shot is another little upgrade we did......the gas strut. We never could get used to fiddling with the two adjustable prop arms, plus the lid was a bit heavy, so we found a 10 pound strut that bolted directly onto the hatch using the original 5/16 - 18 tapped holes.

Here is the strut and pivot pins.

The last step was to replace the headliner and the hatch trim.

Compare this shot with the first one in this post. One hatch down, three to go!