The Old Matelot


matelot;
noun,
sailor; from the French mat-el-oh (plural matelots)
A slang expression, chiefly in Britain, may also mean mate or companion.

Welcome to the Old Matelots' blog, my first (and probably last!) journalistic endeavour. Watch its development and evolution as I make the transition into retirement and the live-aboard, off the grid lifestyle on the sailing yacht, Circe. Follow my fortunes (and misfortunes) in the posts as I work to rehabilitate my home on the water.

UPDATE - Due major back-to-back relationship and health issues during 2017 & 2018 I was involuntarily beached and forced to let Circe go. The blog will remain up for the foreseeable future for informational benefit to other owners of these magnificent boats.


*******************************************************************************************************************************************************************


2010-08-27

Tecma Electric Head

The most obvious thing we noticed when we did our first walk through on Circe was the low grade 'cessy' odour from the head. It wasn't oppressive but it was indicative of a bigger problem in the making and something we didn't want to live with. The head was an old Raritan manual unit with raw water flush into the original holding tank. The system had been re-plumbed at some point with with a low end sanitation hose but the layout was weird, the manual discharge pump for the holding tank was in-line between the tank and deck plate rather than teed off the bottom tank fitting which is more usual. Also, there was a bad kink in the hose between the holding tank and the discharge pump, a perfect point for clogs and almost impossible to clear without disconnection...YUK!! Basically the whole arrangement needed to be upgraded. We did a lot of research on system layout and types of head and got a lot of useful information on system design from Peggie Hall's site.
http://www.boatbuilding.com/article.php/MarineSanitationFactvsFolklore#marine

Choosing the actual toilet 'device' was a bit more difficult as there are so many products promising perfection! After polling FOGgers and others, reading a lot of reviews and comparing features we decided to go with a Tecma Easy Fit, an electric unit with integral macerator. A new holding tank, 'Odor Safe' hose and a system redesign to allow us the choice of either raw water or fresh water flush completed the package.

http://www.yachtproductsintl.com/category.aspx?categoryid=87

The new holding tank and manual discharge pump is now correctly plumbed with a U fitting to eliminate hose kinks. Note the nice big half inch vent elbow on the corner of the holding tank. We considered putting a second vent on the opposite corner to induce a cross-tank flow of air, and may still do that based on how the system works in practice. Plenty of air going through the holding tank goes a long way to controlling odour.


We went with the 'short' version of the Tecma Easy Fit which is designed to sit on a step. It was a perfect fit. The locker door behind cleared the seat cover (barely!) and so we only needed to put a longer hook on the entrance door stop to get a nice clean installation.


From our pre-installation measurements we thought we would need to trim a bit off the louvre door to the locker behind the head but in the end we had about a quarter inch of clearance. That was a pleasant surprise.   


The entrance door stop was also easily fixed with a longer hook that gives about a half inch clearance.


The controls are simple. The optional selector switch on the right can be set to either house (fresh) or raw (salt) water flush to match the flush water Y valve position. Pushing the button on the left delivers a shot of water to wet the bowl. Pushing the button on the right flushes the head and delivers a dose of rinsing water, then repeats a second time. The small holding tank icon in the bottom right corner of the control panel normally glows green. If the holding tank fills and trips the level sensor (last photo below) the icon in the left corner turns red and the head will not flush until the tank is emptied. It can be overridden in an emergency.


Front view of the two Y valves for switching between fresh and raw water flush (top) and between holding tank or overboard discharge (bottom). The discharge Y valve and the through hull valve (not shown) are both 'red sealed' to keep the Coasties and the Harbormaster happy.


Back view of the two Y valves which select fresh or raw water flush (top) and holding tank or overboard discharge (bottom). Also visible is the power feed to the integral macerator.


Diaphragm pump for raw water flush. 


The holding tank level sensor is the flat red and black gizmo next to the inlet elbow. If the holding tank fills up to the sensor, it trips an alarm and also prevents the head from being flushed. There are two free pump-out stations at our marina and a weekly visiting pump-out service if we get lazy, so we don't have any excuse for letting the tank get that full!


Its still early days but, so far, everything seems to be working as advertised. As every matelot knows, marine heads of all stripes are notorious for problems, both operator and system related, so we are keeping our fingers crossed and hoping we don't have to keep updating this post based on future problems!

2010-08-21

Alameda to Richmond

AUGUST 21 2010 - 37 54' 40.85" N, 122 20' 48.52" W

When we bought Circe she was berthed in Alameda, which was further away from home than we wanted to commute until we could move aboard, so, a new slip was needed! After a lot of research and prowling around the marinas in the North Bay looking for somewhere that combined good facilities, an easy commute and a reasonable price we finally settled on Marina Bay Yacht Harbour in Richmond for Circe's new home. We managed to get an upwind slip on a dock out of the way of the strongest of the prevailing winds.


The marina is relatively new and is built on the site of the old Henry J. Kaiser Shipyard where all of the Liberty and Victory Class cargo ships were built during WW2. The weather is generally a bit better there than in the marinas further west and the Bay fog burns off earlier than elsewhere during the summer months. It is close to open water so there isn't much motoring needed before 'sails up'. Our particular slip doesn't lend itself to easily getting in under sail but everything else seems OK so we'll see how things go.

Below are a few pics we took on our trip from Alameda to Richmond. In the interest of speed and direct routing, because the clock, tide state and wind direction were all against us, we elected to motor, giving the Perkins a good work out! It ran like a champ, +/- 2500 rpm for 3 hours straight with nary a hiccup.


Container handling gantries in the Oakland Estuary. The story goes that George Lucas used them as the inspiration for his Imperial Walker design in the Star Wars movies.


More mega cranes. Bay Bridge dead ahead with the Golden Gate behind it in the haze.


We couldn't believe this ferry.....flying along at about 15 knots and passing so close to this Islander 26 who got the bejesus bounced out of him, as did we. What a jerk!

These container ships are amazing in size and capacity. When you see the containers stacked like this its easy to see why some of them end up in the drink when the weather goes bad in mid ocean!


The Skipper, feigning nonchalance while tooling along next to these Leviathans. They make you feel really small and insignificant!


Bay Bridge with city front and embarcadero beyond.


Original double-deck steel eastern span of Bay Bridge with new concrete single-deck span beyond.


Another old/new Bay Bridge shot.


Admiral at the helm.

Northern tip of Treasure Island at left with Alcatraz and Golden Gate beyond


These barges bring the pre-cast deck sections for the new bridge span to the assembly point. Between trips they are moored out in the north bay. Easy to see in daylight but at night....not so much!


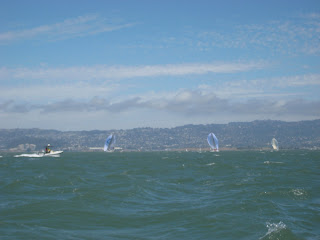
As usual for weekends at this time of year there were several club races going on around the North Bay. We had to navigate around the many turning markers and time our crossing of the various courses when the racers were at the other end!


The Red Oak Victory berthed in the Point Potrero Channel near the entrance to Marina Bay Yacht Harbour. She is one of the last restorable examples of the cargo ships built in Kaiser's famous shipyard. The Victory Class ships replaced the Liberty Class ships late in WW2. The Red Oak Victory was built back in 1944, about a half mile further east from her present berth, and she is now a museum while under restoration.


Circe's new home, Marina Bay Yacht Harbour, Richmond.


Home sweet home....if you listen carefully you can hear the Perkins panting heavily after it's 3 hour work out!

Battery Re-wire

In one of our earlier posts we noted that Circe's pre-purchase survey, conducted by Peter Minkwitz (a first class and extremely thorough Bay Area marine surveyor 510.465.2527), was 'mostly' satisfactory. Overall, Peter's findings validated our initial inspection and assessment of the boat but he did re-emphasise several issues. Some were more serious than others and the biggest problems were electrical, on the supply side of both the AC and DC circuits. We had seen wiring and security issues on the house batteries but Peter also picked up on an AC supply issue. 

There were two major concerns:
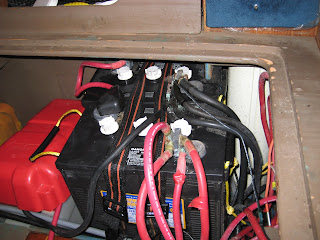
1 Although they were all nearly new, the starting and house batteries were not securely mounted in proper trays and the primary wiring was a real rats nest! Beyond that, a second battery selector had been incorrectly wired when the new Heart inverter/charger was installed, essentially creating an unecessary redundancy with the original selector.  A side issue was that with all the batteries on the port side, along with the galley, head, holding tank, water heater and outboard on the stern rail, we were seeing a distinct list to port!


2 The wiring problem on the AC side involved the main AC breaker  which wasn't doing anything at all! As soon as the shore power cord was plugged in, with the main breaker on or off, there was power to all the AC circuits! Evidently the breaker was being bypassed somehow, meaning there was no AC protection on the boat. 

While cleaning up these issues we also decided to relocate the starting battery and move it behind the engine, to put some weight back on the centre line. Also, because the battery can easily be removed, it will give us better access to the stuffing box, which was difficult with the heater fixed in the stock location. This meant relocating the water heater but it was shot so ditching it and moving the new one wasn't a problem. 


Is that a rats nest or what, scary actually! A couple of inexpensive busses would have helped a lot. The #27 starter battery (far left) will be relocated to where the water heater was, in a removable tray for improved access to the stuffing box. The house batteries will be going into an acid proof box and  the wiring cleaned up.


The hot water heater was in bad shape, rusted, leaking and not well located, right over the stuffing box. A new one will go under the Pullman next to the holding tank, making way for the relocated starting battery, which will be in an easily removable tray for the times we need to get to the stuffing box.


Much better.....clean, tidy and SAFE! The edge of the access panel in the dinette bench had to be notched to make it easier to lift the house batteries in and out but the result is a much better set-up.


Heck, we're already using up the free space we created by moving the starting battery. They say boats are like a women's purse, if there is space in it then something will fill it!


There is now all kinds of room to access the stuffing box whenever we need to. We considered putting a PSS in but after re-packing the gland with ten bucks worth of Tefpak we have an almost completely dry bilge and a much simpler set-up.


We were really happy with the changes. It was a big improvement, securing things properly, getting rid of the spaghetti, taking some weight off the port side, freeing up some additional space under the forward dinette seats and improving access to the stuffing box. It was a lot of work but we solved a lot of issues.

2010-08-14

Back in the Water

We splashed Circe this week after getting her a fresh bottom paint job and fixing some electrical issues (detailed elsewhere in a separate post). Everything turned out very well and we are anxious to get her into her new slip and start on the topsides cosmetics.


After researching the many bottom paint products available, and recalling our own past experiences, we finally settled on 2 coats of blue Interlux Micron CSC for the old girl. As Circe was sitting really low on her lines we also raised the waterline a couple of inches. Unlike most other ablative coatings Interlux claims CSC will not deteriorate due to drying during a 'mid-cycle' haul out and will 're-activate' when the boat is put back in the water. We shall see!


While she was hauled out we also had the accent stripe repainted to match the sheer stripe, canvas and bottom paint and had the hull buffed out. The 'gold' paint on the original accent stripe had faded to invisibility and, to our eyes, gold just didn't look right in the overall colour scheme. Also there were quite a few fender scuffs, non of which were bad, just ugly! The paint, buff and wax job alone made the whole boat look really good!   


Now that the hull is looking much better the heat is on to get the topsides cleaned up, buffed and waxed and the exterior bright work refinished.

2010-08-07

Cockpit Table, part deux.


In a previous post we described how our choice of wood finish was driven by our inheritance of a brand new quart of Bristol Finish two part polyurethane. After prepping the cockpit table and drink holder and reading over the instruction sheet a dozen or more times we finally psyched ourselves up enough to take the plunge and put some varnish on! Not knowing how much coverage we would get the first challenge was to decide exactly how much material to mix up for the first few coats. The table and particularly the drink holder are quite small pieces and while we didn't want to come up short we also didn't want to prepare too much goop and then waste it!


The best case pot life of the activated varnish is about four hours, and at least an hour and a half is recommended between coats, so its easy to end up wasting material if you mix too much.  Finally, we took a few measurements of the two pieces we were going to treat first, made a WAG as to their surface area, and mixed up a little over a half cup.

Looking at the mixed varnish in the pot there didn't seem to be nearly enough to do the job (the facial expression says it all!) and we almost made up a second batch but in the end it went a long way, a lot further than we expected. We elected to use disposable foam 'brushes' we got from Lowes after a lot of searching. We had seen from FOGgers posts and the comments of other people that there are variable qualities of sponge painting pads or 'brushes' and by doing a bit of comparison testing we found that all pads are definitely not created equally! The density of the foam and the  angle of the edge chamfer makes a big difference. The denser the foam and the sharper the edge chamfer the better the results.


With the Lowes pads and by using the 'wet on wet' method described in the Bristol instructions, we managed to get three good coats on the table and two on the cup holder from the first half cup batch. As both the table and drink holder were now two loose pieces and not secured to anything we couldn't completely finish either of them in one shot. For the table part we taped the edges so we could do the bottom first. For the drink holder part we taped off the bottom face that screws to the table top so we had something to sit it on while applying the varnish to the rest.

When we started applying the varnish the first thing that became very clear very quickly was that filling the grain is critical to a good finish. From the pictures you can see there are some big grain flaws on the edges of the table top where repeated heavy handed sanding in the past has gone through the surface teak veneer and exposed the plies underneath! We tried to be as careful as we could with our sanding but, inevitably, we didn't help the problem! Even after very gentle sanding with 220 paper it still took three heavy coats of varnish to fully seal and fill the grain and get rid of the ripples in the finish. Fortunately, as we were working on a flat, level surface the heavy coats couldn't sag or run so we were able to slather the stuff on without a problem.

The drink holder was also difficult to coat but in that case it was because of all the repair work we had to do on it. We couldn't put heavy coats on it because there were so many places for sags to form. A further issue with the drink holder was the difficulty of getting to all the interior edges and corners.......not a good design for a piece that has to be varnished. Four light coats were needed to fill all the imperfections. There were a few  smudges, some runs and a lot of profanities before we finally said "good enough"!

A bigger problem was that, even with our mid 70's warm weather, the Bristol Finish took a lot longer than the 24 hours quoted as curing time for the first three 'wet-on-wet' coats to become sandable (is that a word?). Even after 48 hours the 220 sanding pads clogged quickly when we tried to prep for the final finish coat. At first we thought that the extra heavy coats we put on the table were the cause but then realised that the drink holder with its light coats had the same issues. We double checked our mixing ratios and they were fine so the curing  time in the spec sheet was definitely optimistic for indoor application. Maybe it cures a lot faster outdoors?  In the end it took 3 full days before the surfaces on both pieces were hard enough for sanding without clogging. For flatting before the final coat, we used some 3M Sandblaster pads, they aren't cheap  but they work great in the edges and corners and seem to hold up a bit  better than the production paper.

The final result was not as good as we would have liked but, for our first attempt, it wasn't half bad. Both pieces looked 100% better than when we started. Mainly due to the pre-existing 'over sanding' problem we will never see a perfect result and, ideally, we should get a fresh piece of teak plywood and make a new table but with so many other projects in the pipeline that will have to go to the bottom of the list. This will work for now. To put this project into perspective use the link below to see a replacement table, unfinished and without the drink holder.

http://www.edsonmarine.com/marinestore/index.php?main_page=product_info&products_id=806

For our first experience the Bristol Finish gave a good result in terms of appearance, a very deep gloss. It was easy to apply and brush strokes flowed out well. As far as durability goes we shall see how it holds up over time. Our biggest complaint with it was how long it took to cure to a sandable condition for re-coating. We will do some more research before making a decision on what to use for our next varnishing projects which will be the cap rail, cabin eyebrow strip and cabin top handrails.