The Old Matelot


matelot;
noun,
sailor; from the French mat-el-oh (plural matelots)
A slang expression, chiefly in Britain, may also mean mate or companion.

Welcome to the Old Matelots' blog, my first (and probably last!) journalistic endeavour. Watch its development and evolution as I make the transition into retirement and the live-aboard, off the grid lifestyle on the sailing yacht, Circe. Follow my fortunes (and misfortunes) in the posts as I work to rehabilitate my home on the water.

UPDATE - Due major back-to-back relationship and health issues during 2017 & 2018 I was involuntarily beached and forced to let Circe go. The blog will remain up for the foreseeable future for informational benefit to other owners of these magnificent boats.


*******************************************************************************************************************************************************************


2013-08-14

Cabin Fans

With the new Bomon Windows installed and the original curtains replaced with OceanAire shades, we had no further need for the six decorative blocks that had carried the curtain rods. We realised that with the blocks removed we would have space for several small ceiling mounted fans, for both the galley as well as the rest of the cabin. 

We had always planned for a galley fan, mounted over the stove, to work with the new Bomon opening window, as an extractor and also to keep the 'chef' cool. Beyond that, until we removed the blocks, we really hadn't decided how to positively ventilate the rest of the main cabin. 


Here is a shot of two of the decorative blocks that had supported the original curtain rods. In addition to becoming redundant when the new shades were installed, we also thought the blocks looked very dated, so we decided to take them down and......voila....we suddenly had space for some Caframo fans.


Examining the blocks, we were surprised at how solid and complex they were. Having seen all the other efforts made by Islander to pull cost out of the Freeport, it was surprising that these obviously expensive pieces had survived the 'axe'. Something a lot cheaper and simpler could have worked equally well while still looking presentable?


We bought four Caframo 757 fans. They are both economical, compact and can be rotated and tilted in any direction to cover all areas of the main cabin, galley and nav. station. To validate the locations we temporarily put them up where the forward and aft curtain rail blocks had been, and hid the fan wiring behind the trim strips installed during the Window Trim  upgrade.  


The fans all worked worked very well in the selected locations but looked a bit tacky, sitting on the raw vinyl with the ceiling strips stopping short of the cabin walls.


So, we decided to replace all the ceiling strips and extend them to run all the way out to the cabin walls. Once again we used Art Kleiner at The Boatsmith to make us three new, longer strips. The original strip design was replicated but the width was increased from 1 3/4" to 2 1/2" to match the bases of the Caframo fans. We cut the strips to the correct length and installed them. Here we're using the telescopic boat hook as an adjustable prop while we drill some fixing holes.
The aft and central ceiling strips were replaced quite easily but the replacement of the forward strip was more interesting. Somehow, the fasteners for the turning block to the vang control line on the cabin roof had been drilled straight down through the roof and bolted right through the trim strip!!! When questioned about it during the pre-purchase survey the PO had told us it had been that way when he got the boat!


Shot of the (Harken) vang control line turning block. We noticed it was a different make and model to the mainsheet (Schaefer) turning block. Whoever had installed the vang had done a really crappy job. There were no holes suggesting any other block had ever been fitted so the block must have been installed after the headliner and teak trim was in...........an incompetent PO or another Islander QA snafu.....we'll never know. 


The block was free-running and in generally good shape, so it didn't need to be replaced, but we certainly weren't going to drill through our shiny new trim strip to re-mount it. We came up with a plan to secure it under the headliner using Flange Nuts. We've had good luck using these fasteners in other places where there is restricted access.


Here are the stainless 10 - 24 Flange Nuts we used. Because two of the securing bolts on the block are very close together we had to shave two flanges down to get the necessary clearance.


This shot shows the clearance problem on the block fasteners.


After removing the old trim strip we made an incision in the headliner, opened up the fastener hole slightly and installed the Flange Nuts. 

(If you sniggered at this shot you are BAD!)


Here we've re-installed the block and closed up the headliner with some stainless staples. The marks on the vinyl made by the old trim strip are clearly visible and while this isn't the prettiest thing we ever did the 'incision' will be completely hidden under the new, wider, trim strip.


So, after all that heartburn we were finally able to mount the new forward trim strip and start mounting the fans. Here is the forward stbd corner after the fix.


Here is the  galley fan opposite the opening window. The combination of the two keeps smells and steam out of the cabin, stops the cabin fogging up while cooking and has made the galley a lot more comfortable in hot conditions.


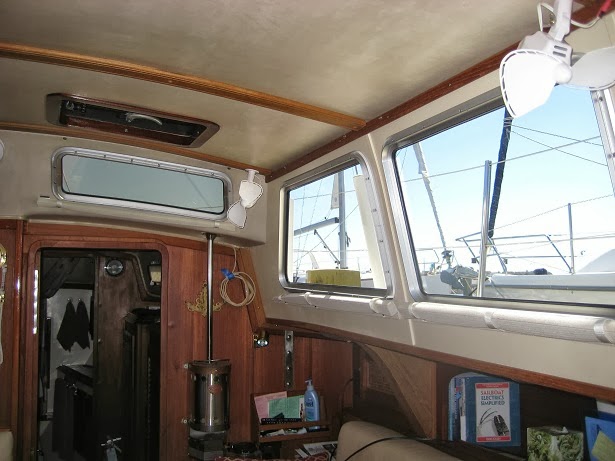
This shot shows the new trim and fans on the starboard side.


And here is the new port side trim and fans. All that remains is to beg, borrow or steal an extended nose staple gun and replace the short pieces of trim welting in the four corners of the cabin to blend the old and the new.


Onward to the next project!


Update 08-01-15


Although we've been happy with the performance and economy of the two-speed Caframo fans, we were a bit irritated that they had a tendency to vibrate slightly when running in high speed mode. The vibration was caused by the molded polyethylene blades being out of balance and resulted in slight 'chatter' at the serrated teeth of the stand-off post. All four fans had the same problem and while the chatter was almost imperceptible on the low speed setting, it was quite noticeable in high speed. What to do? 


The stand-off post has a central, adjustable clamp that holds the upper and lower segments together under spring tension. We fussed with the clamp and found that by fully tightening it the vibration was eliminated, but then the two segments of the post were locked together and there was no longer any way to rotate the fan. By using washers above and below the spring we tried different levels of tension on the clamp bolt but the result was always the same, the vibration persisted until we fully tightened the clamp. Another approach was needed.   


Plan B was to try and improve the balance of the fan blades. By trial and error we found that a small piece of Gorilla tape strategically stuck on a fan blade improved things significantly. Sadly we soon found that the tape wouldn't hold for more than a few minutes in high speed operation. On a hot day the adhesive softened to the point where centrifugal force caused the tape to fly off! What next?    


A light finally appeared at the end of the tunnel when we tried wedging things between the teeth of the stand-off. By jamming a piece of thin felt between the two segments we discovered the fan quieted down completely, even at high speed. 


Plan C was to come up with a clean way to get some felt between the two halves of the stand-off. We used some 1/16" adhesive backed felt and cut some washers from it.


We took the stand-off apart and slipped the felt washers over the clamp bolt, between the   teeth. 


When we reassembled the stand-off the teeth were held apart slightly, just enough to stop the vibration while still allowing the fan to be rotated. Problem finally solved.


It seems we weren't the only ones suffering from this problem as the whole stand-off assembly for the Model 747 has been redesigned. New owners don't have to worry about chattering teeth.....who'd have thought!

2013-08-12

Cabin Trim

During the installation of the Bomon Windows in Circe's main cabin we ripped out all the factory vinyl and foam coverings from the walls and under-deck areas, and we didn't want to replace it. Originality isn't important to us plus we thought the vinyl was ugly and impractical........and don't even get us started on wood rot, rusty staples and broken zippers....but what to use as a replacement? 

While we were procrastinating and trying to decide how to finish the cabin trim we got distracted with other projects and suddenly, almost 2 years had passed.......check the post dates.......so, we decided we needed to 'git 'er done'!

We had seen several DIY interior rebuilds on other boats where rigid panels had been used quite effectively to replace soft trim and carpet liners so we decided to try our hand at making some window surround panels. We first considered teak faced plywood, stained and oiled to match the remaining original woodwork, but in the end we decided that painting the panels to match the original headliner and the new upholstery would help keep the cabin bright.

So, from MacBeath Lumber we bought two sheets of 4mm Okoume marine plywood, single side finished. To get the wood onto the boat we sliced the sheets down to manageable sized blanks, 48" x 25". We chose the thin wood so as to keep the total cabin wall thickness, including the new panels, less than the depth of the registers on the Bomon window extrusions. As it turned out, even with the thin panel material, we still had to buy longer screws to ensure full engagement when the window clamping rings were re-fitted.  

As a first step we applied Smiths penetrating epoxy (co-incidentally made right here in Richmond CA) to both sides of the panel blanks and to the cabin walls to guard against future rot problems, if we ever have another leaking window. This shot shows the penetrating epoxy going onto the inside face of the Hydrotek cabin wall liners.


Next we made some patterns for the trim panels from 60# Kraft paper and.........


.......then traced the outlines onto the plywood blanks.


We used our ancient jig saw, with a fine tooth blade, to cut the outside profile of the panels.


Cleaning up the edges with the detail sander. We also sanded what was going to become the finished front face of the panels, to knock down the grain a bit.....it tends to rise after the application of the epoxy. This shot also shows the areas that were treated with the penetrating epoxy. No point putting it on the central area that was going to be cut out!


After several fit-trim-fit-trim cycles we were happy with the way everything looked and transferred the outline of the actual window apertures onto the blank trim panels. We cut them out from the back side, to minimise chipping of the front side of the panels.


Next was three coats of Zinsser Bulls Eye heavy surfacing primer, with a light sanding (220 grit) after the first two coats to knock down the remaining wood grain. We wanted to see a little bit of the wood grain, to help give the panels some texture, but not so much that it looked rough. 


Back when we first installed the Bomon windows we had painted the upper part of the aft cabin/cockpit bulkheads to brighten up the Galley and Nav Station. We planned to do the same with the new window trim panels.


The bulkhead paint had been mixed to match a swatch of the headliner naugahyde. We had plenty of paint left over so it was the obvious choice for the new window surround panels.


First colour coat being applied.


When we came to applying the final colour coat there was a 20kt wind howling through the marina so we we moved things inside to minimise dust and crud getting onto the fresh paint. 


After the penetrating epoxy was dry we were able to start fitting the trim panels. We removed each window and put new seals on them before re-installing them over the trim panels. Here is the finished forward panel on the stbd side.


The centre panel and...........


.........finally, the aft panel. 


This shot shows the teak trim we fitted over the headliner retaining strip. The blue tape shows the position of the screws holding the retainer, so we  wouldn't hit them with the trim fasteners


Here we are re-installing the window shades. We taped them in place before final fastening while trying to get the best pleat alignment between the shades on the three windows, difficult with compound curves on the cabin walls. 


Here are all three shades installed on the starboard side, not perfectly aligned but pretty close.


Because we had built a separate panel for each window we were left with a small gap where the panels butted together.


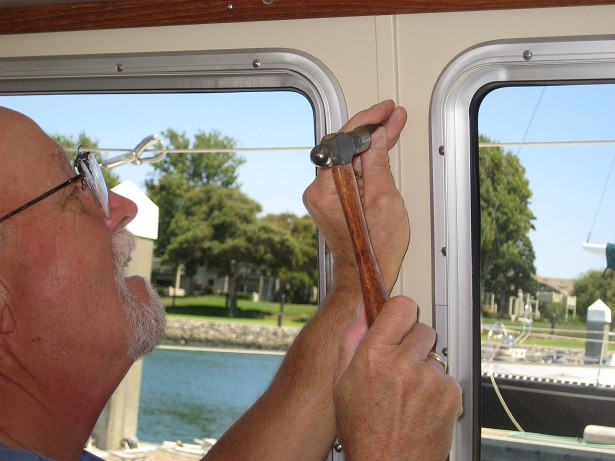
We considered using teak trim strips to cover the panel joints but then decided teak would draw the eye too much so we went with trim strips painted to match the panels. Here we are securing the trim with #18 x 5/8" brass brads.  We deep punched them and.........


.......used a little putty and paint to camouflage them. Here is the putty going on.


And here is the final result....not to shabby a job for a couple of superannuated Matelots using hand tools and a Workmate on a windy dock! Next up will be similar treatment for trimming the areas under the side decks. Stay tuned.


UPDATE 2013-09-21
The last project in the cabin reconstruction was to re-install the original vinyl trim welting to blend the new window surround panels we had just built with the original headliner. During the tear down for the Bomon Window  installation we pulled the welting loose and left it hanging 'as was' until we knew exactly how we were going to finish things. Checking the Blog post dates that was two years ago.......amazing how time flies when you're re-habbing an old boat!


This shot was Christmas 2011 and shows the trim welting in the two forward corners of the cabin beginning its two year 'holding pattern'....literally and metaphorically. Fits right in with the decorations....No?


This one shows the aft welting during the June 2012 helm rehab project.....still hanging!


Here is a more recent one, after the window surrounds were finished......still hanging! 


OK, after the heartburn of stripping out the 'naugahyde nightmare' we did say NO MORE STAPLES....but realistically there was no other option for re-installing the old welting. It is designed specifically to be stapled. In truth it's an effective way to mask joins and transitions in soft trim but we just have a 'thing'  about staples.


Here is the welting 'open' to allow stapling over the raw edge of the joint to be covered and.......


......here it is closed, to hide the staples and cover things up at the seam or joint.


So, if we absolutely had to use staples then we needed to get some stainless ones. First discovery, stainless staples, in the generic 1/2" crown 22 gauge type found at Home Depot don't work well. We got and tried some with our little Wal-Mart electric stapler but they really were too big and didn't holding the welting securely. We needed 1/4" narrow crown staples, similar to what the factory had used. Second discovery, 1/4" crown stainless staples are typically a special order item and aren't available at the usual hardware outlets. We tried numerous on-line suppliers before finally finding some 1/4" crown x 3/8" leg in 18 gauge, on line at Best Materials . 


Third discovery, industrial grade SS staples aren't cheap......$30 + $6 freight for this box of 1000, the minimum quantity available. 


Fourth discovery, these industrial narrow crown staples need to be applied with an industrial, air powered stapler.....is this project getting away from us? 


After failing to beg, borrow or steal a suitable stapler we were stalled. Should we buy a $100 tool we would almost certainly never use again after this project? We already had four times the number of staples we needed! Should we rip out the remaining welting and replace it all with teak trim? What to do? 


We finally bit the bullet and bought a Senco pneumatic stapler. We also borrowed a 150 psi compressor from our local Boat Tech/Diver and were finally ready to go!

After all the preparation and build-up, the actual re-installation of the welting was a bit of an anticlimax. All four corners of the cabin were completed quite quickly. Here we are starting on the aft starboard corner of the cabin and........ 


.........here we are about halfway across the cabin, and.......


......here's the finished result. Amazing how easy things are with the right tools!


Here is a shot of the finished aft port side and.......


.....the forward port side. The welting does a good job of blending the old with the new and the 'ol homestead' is really starting to look quite civilised!


And finally.....we knew we wouldn't use the stapler again in the foreseeable future, if ever, so we negotiated with our Diver to trade it for an equivalent value in no-charge bottom cleanings and occasional use of the stapler as needed......so, we all lived happily ever after! 


2013-07-22

Upholstery Upgrade

Up to this point in our adventure all of Circe's main cabin upholstery, dinette and settee, was the factory original, 1982 vintage. The actual mid-blue cover material appeared to be automotive style velour and had held up quite well, considering its age, but the foam bases hadn't fared so well! In particular the dinette was really bad. The bench cushions were beat down to the point where there was zero resilience in them, particularly in the corner, and the back cushions were shapeless and had gaps all around. 30 years of use and abuse had taken their toll. 


The dinette as it was. Note the gaps around the back cushions and the squashed seat cushions in the corner. The two seat cushions had a mitre corner design so they couldn't be swapped to even out the wear on them.....not good.


The settee was in better shape, although most of the buttons in the seat cushions had disappeared over the years. A bigger problem with it was there were so many cushions, six of 'em....three backs and three seats, plus they were all dead flat, no shape at all. In the original design, when the settee was also a fold away double berth and there were four small small access points to the storage in the settee back, having all those cushions made sense. They had to be small for easy access to the various storage points and they had to be flat because they also doubled as the mattress for the berth. Another issue with the flat cushions was that they weren't very comfortable in 'settee mode'. After we removed the fold away berth, and modified and consolidated the settee storage areas, we had two large hatches in the settee back and two in the base, so we always had to remove at least four cushions to open any of them.....a pain. 


The settee as it was. Note the three seat back cushions appear short due to the removal of the fold away berth.


We briefly considered trying to save the dinette seat covers by cutting new foam bases for them and replacing the seat backs. That way we would only have to re-upholster the settee to a four cushion design with a contrasting fabric. That route would have been less expensive than complete re-upholstery of both dinette and settee but, in the end, would have left us with basically unchanged interior and we wanted a fresh look. 

So, in the end, we bit the bullet and went the whole hog.....complete re-upholstery of both the settee and dinette plus some new throw pillows.We took bids on the job and finally settled on North Beach Marine Canvas in San Francisco. For the cushions we chose a faux leather material that closely matched the headliner, which is still in good shape, and complimented them with a geometric pattern in a rust red colour for the pillows.....looks quite civilised, really helps brighten the main cabin and perhaps most importantly, its all very comfortable!.


Here is the new look dinette. We redesigned the seats into three pieces having a small triangular corner cushion and two interchangeable side cushions so we can spread the wear.


The new, four cushion settee with matching bolster pillows.


Truth be told the whole job was quite a chunk of change, more than we had budgeted, but, hey.....it's our home right?